
"2024 Approved Effective Strategies to Plan Zoom Sessions"
Effective Strategies to Plan Zoom Sessions
How to Schedule Meetings on Zoom?


Richard Bennett
Mar 27, 2024• Proven solutions
Video conferencing is becoming increasingly important as a growing number of businesses opt to move the majority of their operations online. A video conferencing application like Zoom enables you to organize your calendar weeks or even months in advance by scheduling meetings for a particular date.
Scheduling a Zoom meeting isn’t much more difficult than starting a new meeting on Zoom, as this is a built-in option that is available on all versions of the app. So, in this article, we are going to show you how to schedule meetings on Zoom from your web browser, a computer or a mobile device.
 /a>
/a>How to Schedule Zoom Meetings from a Web Browser?
Zoom offers extensions for both Mozilla Firefox and Google Chrome that make the scheduling process faster and easier. However, you don’t have to install these extensions to your web browser in order to schedule a meeting, as this task can also be performed from the Zoom web portal.
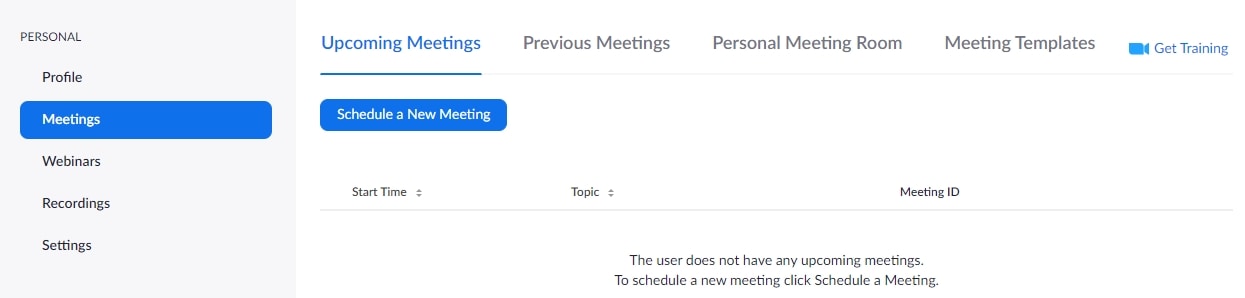
Click on the Meetings tab after signing in to your Zoom account, and then click on the Schedule a New Meeting button that is located in the Upcoming Meetings tab. You can then start customizing the meeting’s options by adding a topic, creating a full description of the meeting or setting the date and time of the meeting.
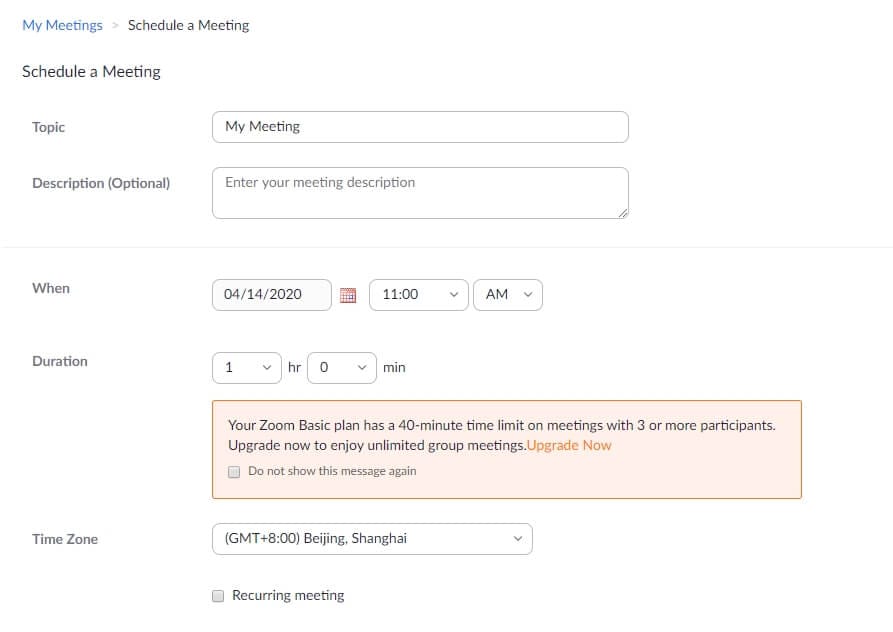
Zoom also lets you specify the duration of a meeting, but you don’t have to worry about entering the exact duration of a meeting since the meeting is not going to end automatically after the specified period of time expires.

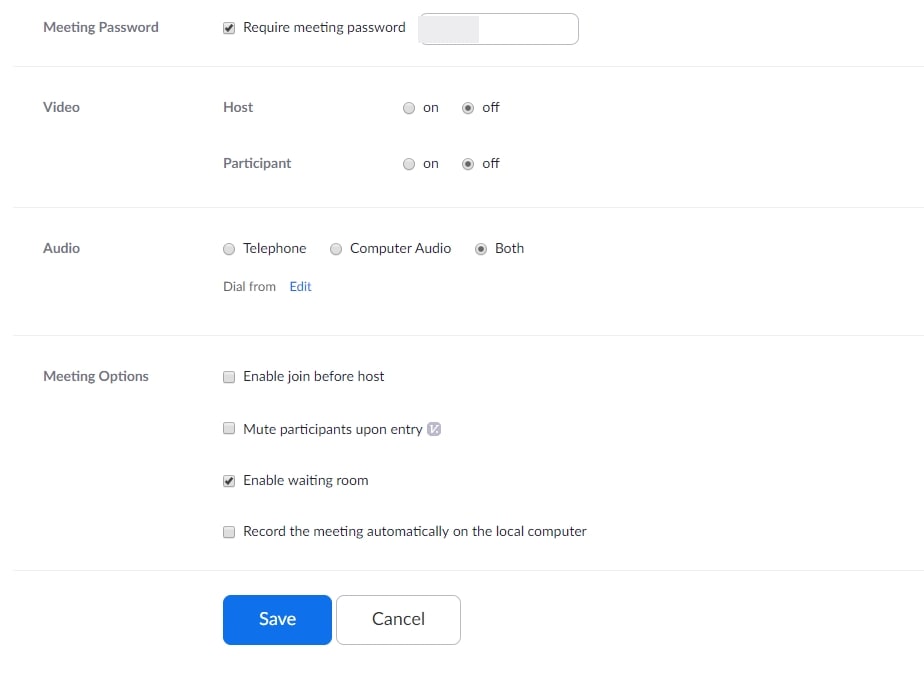
Furthermore, you can decide if the password for a meeting is mandatory, enable the host and participant video option or allow attendees to join using Computer audio, Telephone audio or both. As a host of the meeting you are scheduling you can choose to mute all participants when they enter a meeting or allow them to join a meeting before you.
Once you’re done adjusting the meeting’s settings you should click on the Save button and add the meeting to your Google, Outlook or Yahoo calendar .
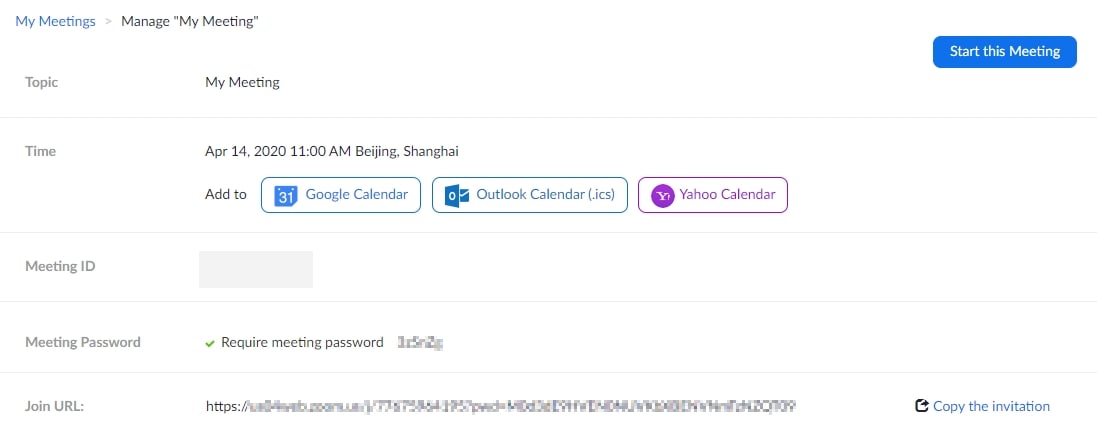
You can then copy the invitation to the meeting and send it to the participants via email. For those who just into Zoom video conference, we recommend you to check the guide to How to set up Zoom Meetings for better remote video call experience.
How to Schedule Meetings with Zoom Desktop Client?
Mac and PC users can schedule meetings with Zoom desktop client in only a few easy steps. Once you launched Zoom and signed in to your account you should click on the Schedule icon.

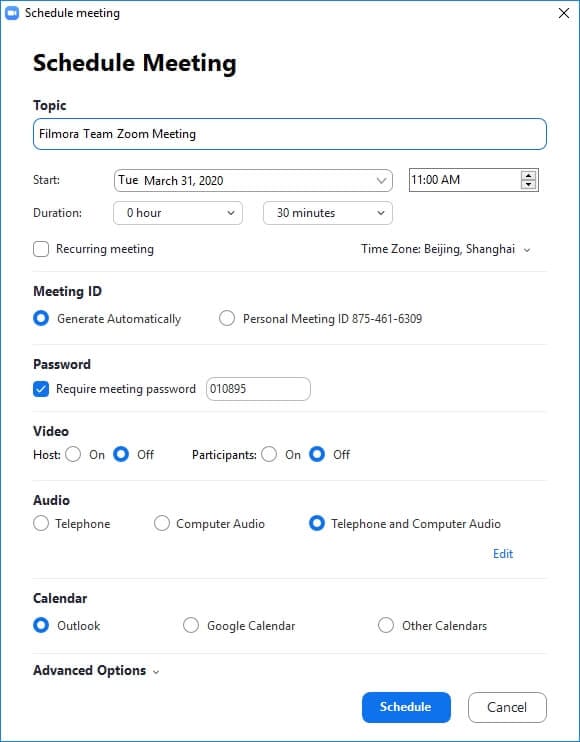
The Scheduler window will appear on the screen, and you can enter the topic, specifying the start date and time of the meeting or set its duration. Your computer’s time zone is going to be used by default, but you can easily change this by clicking on a Time Zone drop-down menu and selecting a new time zone.
You can also choose if you want to enable the host and participants video, pick one of the available audio options or request a meeting password. Select one of the calendar options before clicking on the Schedule button to confirm the changes you’ve made. Afterward, you should open the calendar service you selected to add the meeting you created.
How to Schedule Meetings from a Mobile Device?
Both iOS and Android versions of Zoom enable you to schedule meetings and the process of scheduling a meeting with Zoom for mobile devices is identical. Tap on the Schedule button after you launch the Zoom app and proceed to adjust the meeting settings the same way you would on a web portal or desktop client version of this video conferencing platform.
 WinUtilities Pro
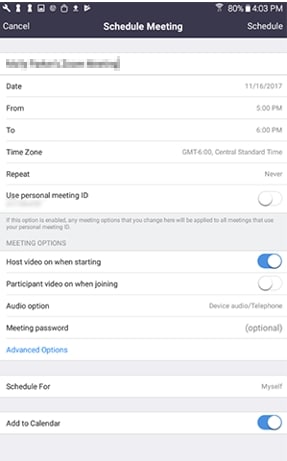
Keep in mind that some options are not going to be available if they are disabled or locked on your account or in a group in which you are creating a meeting. Once you’ve adjusted the video and audio options, set the time and date of a meeting or enabled the Add to Calendar feature you can tap on the Done button to complete the setup process.
How to Schedule Recurring Meetings?
Zoom allows all of its users to schedule recurring meetings from the web portal, desktop client or the mobile app. All you have to do is click on the checkbox next to the Recurring Meeting option while scheduling a new meeting.
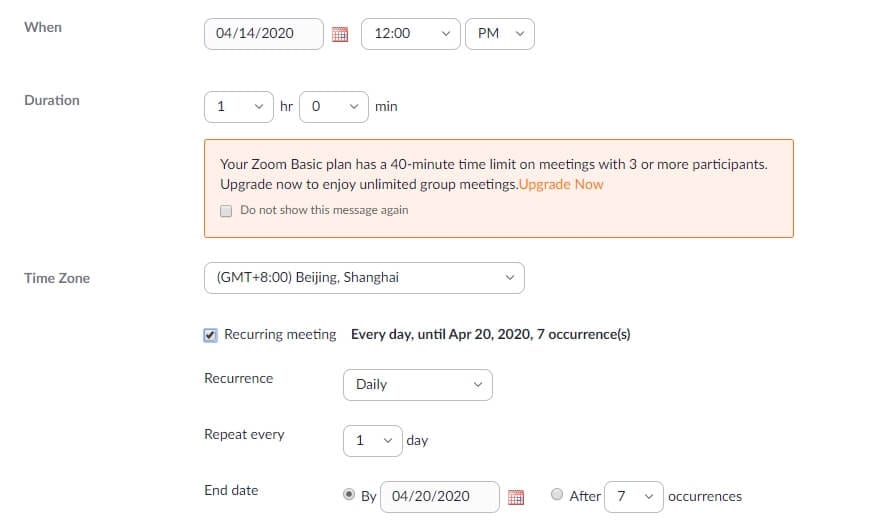
Once the Recurring Meeting feature is enabled you can proceed to choose the recurrence frequency, specify how often the meeting is going to be repeated and set the expiry date. The number of occurrences is limited to fifty, but you can select the No Fixed Time setting if you want your meeting to occur more than fifty times.
Moreover, hosts of recurring meetings that require registration must choose if they want to allow attendees to register once to attend all occurrences, register for each occurrence they attend or register once and pick the occurrences they want to attend.
Click on the Save button to confirm the changes you’ve made and then click on the Schedule button to complete the process of creating a recurring meeting. Hosts of Zoom meetings can add, edit or delete occurrences after a recurring meeting is created, although meetings that are added to a calendar service must be edited through the calendar service to which they were added.
Head over to the Meetings tab, click on the recurring meeting you would like to edit and then locate the Show All Occurrences option.

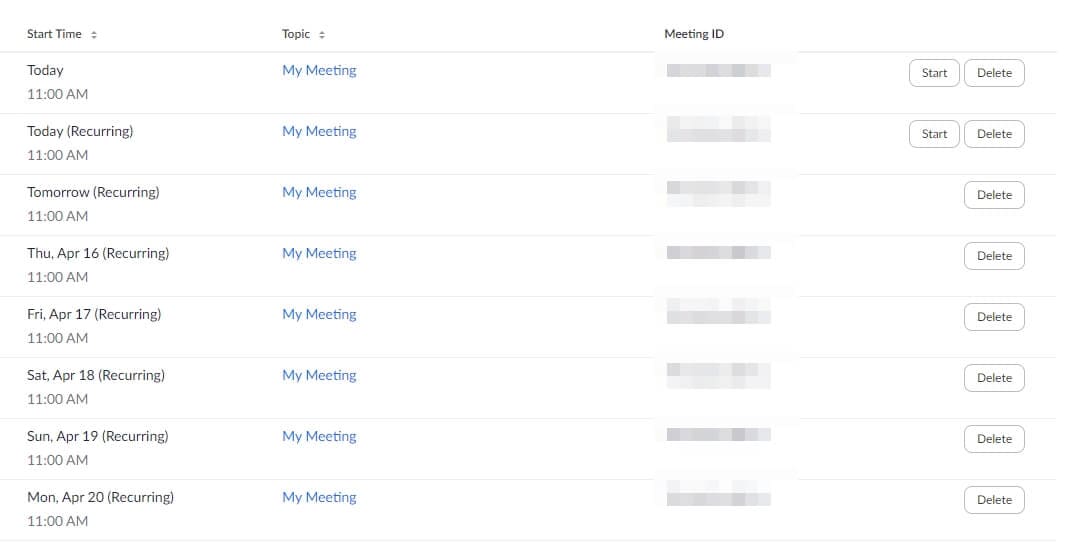
The list of all occurrences is going to appear on your screen and you should click on Edit or Delete options, depending on what you want to do. In case you would like to create a new occurrence, you should click on the Add Another Occurrence option that is located at the bottom of the list of meeting occurrences. When done click on the Save button to confirm the changes you’ve made. In addition, Zoom allows you to edit all occurrences if you want to make the same change to a meeting.
Conclusion
Scheduling meetings with Zoom is a straightforward process anyone can complete even if they haven’t used this video conferencing platform before. Users who are are communicating with members of their team or their clients can benefit the most from scheduling Zoom meetings because it will enable them to know exactly when their next meeting is going to take place. Was this article helpful? Leave a comment and share your opinions with us.
Richard Bennett
Richard Bennett is a writer and a lover of all things video.
Follow @Richard Bennett
Richard Bennett
Mar 27, 2024• Proven solutions
Video conferencing is becoming increasingly important as a growing number of businesses opt to move the majority of their operations online. A video conferencing application like Zoom enables you to organize your calendar weeks or even months in advance by scheduling meetings for a particular date.
Scheduling a Zoom meeting isn’t much more difficult than starting a new meeting on Zoom, as this is a built-in option that is available on all versions of the app. So, in this article, we are going to show you how to schedule meetings on Zoom from your web browser, a computer or a mobile device.

How to Schedule Zoom Meetings from a Web Browser?
Zoom offers extensions for both Mozilla Firefox and Google Chrome that make the scheduling process faster and easier. However, you don’t have to install these extensions to your web browser in order to schedule a meeting, as this task can also be performed from the Zoom web portal.
Click on the Meetings tab after signing in to your Zoom account, and then click on the Schedule a New Meeting button that is located in the Upcoming Meetings tab. You can then start customizing the meeting’s options by adding a topic, creating a full description of the meeting or setting the date and time of the meeting.

Zoom also lets you specify the duration of a meeting, but you don’t have to worry about entering the exact duration of a meeting since the meeting is not going to end automatically after the specified period of time expires.

Furthermore, you can decide if the password for a meeting is mandatory, enable the host and participant video option or allow attendees to join using Computer audio, Telephone audio or both. As a host of the meeting you are scheduling you can choose to mute all participants when they enter a meeting or allow them to join a meeting before you.
Once you’re done adjusting the meeting’s settings you should click on the Save button and add the meeting to your Google, Outlook or Yahoo calendar .
You can then copy the invitation to the meeting and send it to the participants via email. For those who just into Zoom video conference, we recommend you to check the guide to How to set up Zoom Meetings for better remote video call experience.
How to Schedule Meetings with Zoom Desktop Client?
Mac and PC users can schedule meetings with Zoom desktop client in only a few easy steps. Once you launched Zoom and signed in to your account you should click on the Schedule icon.
The Scheduler window will appear on the screen, and you can enter the topic, specifying the start date and time of the meeting or set its duration. Your computer’s time zone is going to be used by default, but you can easily change this by clicking on a Time Zone drop-down menu and selecting a new time zone.
You can also choose if you want to enable the host and participants video, pick one of the available audio options or request a meeting password. Select one of the calendar options before clicking on the Schedule button to confirm the changes you’ve made. Afterward, you should open the calendar service you selected to add the meeting you created.
How to Schedule Meetings from a Mobile Device?
Both iOS and Android versions of Zoom enable you to schedule meetings and the process of scheduling a meeting with Zoom for mobile devices is identical. Tap on the Schedule button after you launch the Zoom app and proceed to adjust the meeting settings the same way you would on a web portal or desktop client version of this video conferencing platform.
Keep in mind that some options are not going to be available if they are disabled or locked on your account or in a group in which you are creating a meeting. Once you’ve adjusted the video and audio options, set the time and date of a meeting or enabled the Add to Calendar feature you can tap on the Done button to complete the setup process.

How to Schedule Recurring Meetings?
Zoom allows all of its users to schedule recurring meetings from the web portal, desktop client or the mobile app. All you have to do is click on the checkbox next to the Recurring Meeting option while scheduling a new meeting.
Once the Recurring Meeting feature is enabled you can proceed to choose the recurrence frequency, specify how often the meeting is going to be repeated and set the expiry date. The number of occurrences is limited to fifty, but you can select the No Fixed Time setting if you want your meeting to occur more than fifty times.
Moreover, hosts of recurring meetings that require registration must choose if they want to allow attendees to register once to attend all occurrences, register for each occurrence they attend or register once and pick the occurrences they want to attend.
Click on the Save button to confirm the changes you’ve made and then click on the Schedule button to complete the process of creating a recurring meeting. Hosts of Zoom meetings can add, edit or delete occurrences after a recurring meeting is created, although meetings that are added to a calendar service must be edited through the calendar service to which they were added.
Head over to the Meetings tab, click on the recurring meeting you would like to edit and then locate the Show All Occurrences option.
 vMix 4K - Software based live production. vMix 4K includes everything in vMix HD plus 4K support, PTZ control, External/Fullscreen output, 4 Virtual Outputs, 1 Replay, 4 vMix Call, and 2 Recorders.
The list of all occurrences is going to appear on your screen and you should click on Edit or Delete options, depending on what you want to do. In case you would like to create a new occurrence, you should click on the Add Another Occurrence option that is located at the bottom of the list of meeting occurrences. When done click on the Save button to confirm the changes you’ve made. In addition, Zoom allows you to edit all occurrences if you want to make the same change to a meeting.
Conclusion
Scheduling meetings with Zoom is a straightforward process anyone can complete even if they haven’t used this video conferencing platform before. Users who are are communicating with members of their team or their clients can benefit the most from scheduling Zoom meetings because it will enable them to know exactly when their next meeting is going to take place. Was this article helpful? Leave a comment and share your opinions with us.
Richard Bennett
Richard Bennett is a writer and a lover of all things video.
Follow @Richard Bennett
Richard Bennett
Mar 27, 2024• Proven solutions
Video conferencing is becoming increasingly important as a growing number of businesses opt to move the majority of their operations online. A video conferencing application like Zoom enables you to organize your calendar weeks or even months in advance by scheduling meetings for a particular date.
Scheduling a Zoom meeting isn’t much more difficult than starting a new meeting on Zoom, as this is a built-in option that is available on all versions of the app. So, in this article, we are going to show you how to schedule meetings on Zoom from your web browser, a computer or a mobile device.
How to Schedule Zoom Meetings from a Web Browser?
Zoom offers extensions for both Mozilla Firefox and Google Chrome that make the scheduling process faster and easier. However, you don’t have to install these extensions to your web browser in order to schedule a meeting, as this task can also be performed from the Zoom web portal.

Click on the Meetings tab after signing in to your Zoom account, and then click on the Schedule a New Meeting button that is located in the Upcoming Meetings tab. You can then start customizing the meeting’s options by adding a topic, creating a full description of the meeting or setting the date and time of the meeting.
Zoom also lets you specify the duration of a meeting, but you don’t have to worry about entering the exact duration of a meeting since the meeting is not going to end automatically after the specified period of time expires.

Furthermore, you can decide if the password for a meeting is mandatory, enable the host and participant video option or allow attendees to join using Computer audio, Telephone audio or both. As a host of the meeting you are scheduling you can choose to mute all participants when they enter a meeting or allow them to join a meeting before you.
Once you’re done adjusting the meeting’s settings you should click on the Save button and add the meeting to your Google, Outlook or Yahoo calendar .
You can then copy the invitation to the meeting and send it to the participants via email. For those who just into Zoom video conference, we recommend you to check the guide to How to set up Zoom Meetings for better remote video call experience.
How to Schedule Meetings with Zoom Desktop Client?
Mac and PC users can schedule meetings with Zoom desktop client in only a few easy steps. Once you launched Zoom and signed in to your account you should click on the Schedule icon.

The Scheduler window will appear on the screen, and you can enter the topic, specifying the start date and time of the meeting or set its duration. Your computer’s time zone is going to be used by default, but you can easily change this by clicking on a Time Zone drop-down menu and selecting a new time zone.
You can also choose if you want to enable the host and participants video, pick one of the available audio options or request a meeting password. Select one of the calendar options before clicking on the Schedule button to confirm the changes you’ve made. Afterward, you should open the calendar service you selected to add the meeting you created.
How to Schedule Meetings from a Mobile Device?
Both iOS and Android versions of Zoom enable you to schedule meetings and the process of scheduling a meeting with Zoom for mobile devices is identical. Tap on the Schedule button after you launch the Zoom app and proceed to adjust the meeting settings the same way you would on a web portal or desktop client version of this video conferencing platform.
Keep in mind that some options are not going to be available if they are disabled or locked on your account or in a group in which you are creating a meeting. Once you’ve adjusted the video and audio options, set the time and date of a meeting or enabled the Add to Calendar feature you can tap on the Done button to complete the setup process.
How to Schedule Recurring Meetings?
Zoom allows all of its users to schedule recurring meetings from the web portal, desktop client or the mobile app. All you have to do is click on the checkbox next to the Recurring Meeting option while scheduling a new meeting.
 Screensaver Factory, Create stunning professional screensavers within minutes. Create screensavers for yourself, for marketing or unlimited royalty-free commercial distribution. Make screensavers from images, video and swf flash, add background music and smooth sprite and transition effects. Screensaver Factory is very easy to use, and it enables you to make self-installing screensaver files and CDs for easy setup and distribution. Screensaver Factory is the most advanced software of its kind.
Once the Recurring Meeting feature is enabled you can proceed to choose the recurrence frequency, specify how often the meeting is going to be repeated and set the expiry date. The number of occurrences is limited to fifty, but you can select the No Fixed Time setting if you want your meeting to occur more than fifty times.
Moreover, hosts of recurring meetings that require registration must choose if they want to allow attendees to register once to attend all occurrences, register for each occurrence they attend or register once and pick the occurrences they want to attend.
Click on the Save button to confirm the changes you’ve made and then click on the Schedule button to complete the process of creating a recurring meeting. Hosts of Zoom meetings can add, edit or delete occurrences after a recurring meeting is created, although meetings that are added to a calendar service must be edited through the calendar service to which they were added.
Head over to the Meetings tab, click on the recurring meeting you would like to edit and then locate the Show All Occurrences option.
 Forex Robotron Basic Package
The list of all occurrences is going to appear on your screen and you should click on Edit or Delete options, depending on what you want to do. In case you would like to create a new occurrence, you should click on the Add Another Occurrence option that is located at the bottom of the list of meeting occurrences. When done click on the Save button to confirm the changes you’ve made. In addition, Zoom allows you to edit all occurrences if you want to make the same change to a meeting.
Conclusion
Scheduling meetings with Zoom is a straightforward process anyone can complete even if they haven’t used this video conferencing platform before. Users who are are communicating with members of their team or their clients can benefit the most from scheduling Zoom meetings because it will enable them to know exactly when their next meeting is going to take place. Was this article helpful? Leave a comment and share your opinions with us.
Richard Bennett
Richard Bennett is a writer and a lover of all things video.
Follow @Richard Bennett
Richard Bennett
Mar 27, 2024• Proven solutions
Video conferencing is becoming increasingly important as a growing number of businesses opt to move the majority of their operations online. A video conferencing application like Zoom enables you to organize your calendar weeks or even months in advance by scheduling meetings for a particular date.
Scheduling a Zoom meeting isn’t much more difficult than starting a new meeting on Zoom, as this is a built-in option that is available on all versions of the app. So, in this article, we are going to show you how to schedule meetings on Zoom from your web browser, a computer or a mobile device.
How to Schedule Zoom Meetings from a Web Browser?
Zoom offers extensions for both Mozilla Firefox and Google Chrome that make the scheduling process faster and easier. However, you don’t have to install these extensions to your web browser in order to schedule a meeting, as this task can also be performed from the Zoom web portal.
Click on the Meetings tab after signing in to your Zoom account, and then click on the Schedule a New Meeting button that is located in the Upcoming Meetings tab. You can then start customizing the meeting’s options by adding a topic, creating a full description of the meeting or setting the date and time of the meeting.
Zoom also lets you specify the duration of a meeting, but you don’t have to worry about entering the exact duration of a meeting since the meeting is not going to end automatically after the specified period of time expires.
Furthermore, you can decide if the password for a meeting is mandatory, enable the host and participant video option or allow attendees to join using Computer audio, Telephone audio or both. As a host of the meeting you are scheduling you can choose to mute all participants when they enter a meeting or allow them to join a meeting before you.
Once you’re done adjusting the meeting’s settings you should click on the Save button and add the meeting to your Google, Outlook or Yahoo calendar .
You can then copy the invitation to the meeting and send it to the participants via email. For those who just into Zoom video conference, we recommend you to check the guide to How to set up Zoom Meetings for better remote video call experience.
How to Schedule Meetings with Zoom Desktop Client?
Mac and PC users can schedule meetings with Zoom desktop client in only a few easy steps. Once you launched Zoom and signed in to your account you should click on the Schedule icon.

The Scheduler window will appear on the screen, and you can enter the topic, specifying the start date and time of the meeting or set its duration. Your computer’s time zone is going to be used by default, but you can easily change this by clicking on a Time Zone drop-down menu and selecting a new time zone.
You can also choose if you want to enable the host and participants video, pick one of the available audio options or request a meeting password. Select one of the calendar options before clicking on the Schedule button to confirm the changes you’ve made. Afterward, you should open the calendar service you selected to add the meeting you created.
How to Schedule Meetings from a Mobile Device?
Both iOS and Android versions of Zoom enable you to schedule meetings and the process of scheduling a meeting with Zoom for mobile devices is identical. Tap on the Schedule button after you launch the Zoom app and proceed to adjust the meeting settings the same way you would on a web portal or desktop client version of this video conferencing platform.
Keep in mind that some options are not going to be available if they are disabled or locked on your account or in a group in which you are creating a meeting. Once you’ve adjusted the video and audio options, set the time and date of a meeting or enabled the Add to Calendar feature you can tap on the Done button to complete the setup process.
How to Schedule Recurring Meetings?
Zoom allows all of its users to schedule recurring meetings from the web portal, desktop client or the mobile app. All you have to do is click on the checkbox next to the Recurring Meeting option while scheduling a new meeting.
Once the Recurring Meeting feature is enabled you can proceed to choose the recurrence frequency, specify how often the meeting is going to be repeated and set the expiry date. The number of occurrences is limited to fifty, but you can select the No Fixed Time setting if you want your meeting to occur more than fifty times.
Moreover, hosts of recurring meetings that require registration must choose if they want to allow attendees to register once to attend all occurrences, register for each occurrence they attend or register once and pick the occurrences they want to attend.
Click on the Save button to confirm the changes you’ve made and then click on the Schedule button to complete the process of creating a recurring meeting. Hosts of Zoom meetings can add, edit or delete occurrences after a recurring meeting is created, although meetings that are added to a calendar service must be edited through the calendar service to which they were added.
Head over to the Meetings tab, click on the recurring meeting you would like to edit and then locate the Show All Occurrences option.
The list of all occurrences is going to appear on your screen and you should click on Edit or Delete options, depending on what you want to do. In case you would like to create a new occurrence, you should click on the Add Another Occurrence option that is located at the bottom of the list of meeting occurrences. When done click on the Save button to confirm the changes you’ve made. In addition, Zoom allows you to edit all occurrences if you want to make the same change to a meeting.
Conclusion
Scheduling meetings with Zoom is a straightforward process anyone can complete even if they haven’t used this video conferencing platform before. Users who are are communicating with members of their team or their clients can benefit the most from scheduling Zoom meetings because it will enable them to know exactly when their next meeting is going to take place. Was this article helpful? Leave a comment and share your opinions with us.
Richard Bennett
Richard Bennett is a writer and a lover of all things video.
Follow @Richard Bennett
- Title: 2024 Approved Effective Strategies to Plan Zoom Sessions
- Author: Duchess
- Created at : 2024-07-21 15:03:26
- Updated at : 2024-07-22 15:03:26
- Link: https://screen-video-capture.techidaily.com/2024-approved-effective-strategies-to-plan-zoom-sessions/
- License: This work is licensed under CC BY-NC-SA 4.0.