
"2024 Approved Innovating Presentations Using Adobe Captivate"
Innovating Presentations Using Adobe Captivate
How to Record a Video Presentation Using Adobe Captivate
 Power Tools add-on for Google Sheets, Lifetime subscription

Max Wales
Mar 27, 2024• Proven solutions
The Internet has changed the way we look at education since it grants us access to unlimited amounts of knowledge. Adobe Captivate is one of the most powerful software products that enables its users to produce video presentations and interactive eLearning content with powerful authoring tools. The software is designed to reduce the amount of time you have to spend on setting up the video recording session, so you can focus on the quality of the content you are presenting.
To make things even better, the Adobe Captivate software is compatible with all documents created with Microsoft PowerPoint and in this article we are going to guide you through each step of the process of recording a video presentation using Adobe Captivate.
![]()

The All-in-One Screen Recorder & Video Editor
- Record desktop screen, voiceover, and webcam simultaneously
- Edit recorded clips quickly with a wide range of professional tools
- Built-in plentiful templates and effects
- Export to MP4, MOV, MKV, GIF and multiple formats
For Win 7 or later (64-bit)
For macOS 10.12 or later
 Secure Download
How to Record a Video Presentation Using Adobe Captivate
Before you can start working on your new project you first need to install the software. If you haven’t already done that, you can download Adobe Captivate by following this link. You will also have to register and activate the software in order to be able to use every option Adobe Captivate has to offer. You can find the full list of the software’s featureshere.
Step 1 - Setting up a video recording session
Double-click on Adobe Captivate’s desktop icon to launch the software, and then head over to Microsft PowerPoint and open the presentation you’d like to record in the second monitor. Adobe Captivate enables you to capture all animations, objects or multimedia featured in the PowerPoint presentation and it also allows you to record any on-screen activity you want.


Click on the Demo option in the Adobe Captivate’s welcome window, and then click on the Create button in the lower right corner of the screen.
Step 2 - Select the application and designate the area of the screen you’d like to record
After you click on the Create button, a new window will appear on the screen. In the upper left corner of the window, you’ll be able to see Screen Area and Application options. Select the Application feature and head over to the drop-down menu located directly below it to select the Microsoft PowerPoint application or any other app compatible with the software.

In the Snap To section of the window, you’ll be able to choose between Application Window, Application Region, and Custom Size options. Select the feature that best meets the demands of the project you are working on, and then click on the Panning drop down menu if you would like to add the panning effect to the video recording you are creating. The Audio feature lets you record both narration and system audio.
Step 3 - Starting a new video recording session
Click on the Settings button if you wish to change the destination on your hard-drive where the video will be saved.

When the new window opens, click on the Browse icon next to the Working Folder feature, and select insert the new destination folder for your video. Above the Working Folder option is the Show Mouse in Video Demo Mode checkbox, make sure it is marked if you want the mouse cursor to be visible in the video and click OK to confirm the changes you’ve made.
Hit the Record button to initiate the video recording session. You can hit the Esc or End buttons to stop recording if you are using a PC, while Mac users can perform the same action by hitting Cmd + Enter keys.
Step 4 - Publish the video
Upon the completion of the video recording session, the Publish Video Demo window will appear on the screen. You’ll be able to save your video as an MP4 file directly to your computer, or you can export the video directly to YouTube, Facebook or Twitter.
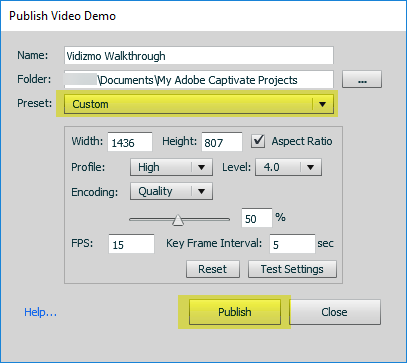
You’ll also be able to set the preferred frame rate, encoding option and aspect ratio. Click on the Publish button after you’ve adjusted all the settings in accordance with the demands of your project.
Conclusion:
Adobe Captivate is much more than just a simple screen recording tool, and if you want, you can use it to perform basic editing actions on your footage. You can also create PIP videos, add smart shapes to a video or insert text captions directly from the software. Did you find this article helpful? Do you think that recording videos with Adobe Captivate is a simple and fun process? Leave a comment and share your opinions with us.
Max Wales
 is a writer and a lover of all things video.
Follow @Max Wales
Max Wales
Mar 27, 2024• Proven solutions
The Internet has changed the way we look at education since it grants us access to unlimited amounts of knowledge. Adobe Captivate is one of the most powerful software products that enables its users to produce video presentations and interactive eLearning content with powerful authoring tools. The software is designed to reduce the amount of time you have to spend on setting up the video recording session, so you can focus on the quality of the content you are presenting.
To make things even better, the Adobe Captivate software is compatible with all documents created with Microsoft PowerPoint and in this article we are going to guide you through each step of the process of recording a video presentation using Adobe Captivate.

![]()

The All-in-One Screen Recorder & Video Editor
- Record desktop screen, voiceover, and webcam simultaneously
- Edit recorded clips quickly with a wide range of professional tools
- Built-in plentiful templates and effects
- Export to MP4, MOV, MKV, GIF and multiple formats
For Win 7 or later (64-bit)
For macOS 10.12 or later
Secure Download
How to Record a Video Presentation Using Adobe Captivate
Before you can start working on your new project you first need to install the software. If you haven’t already done that, you can download Adobe Captivate by following this link. You will also have to register and activate the software in order to be able to use every option Adobe Captivate has to offer. You can find the full list of the software’s featureshere.
Step 1 - Setting up a video recording session
Double-click on Adobe Captivate’s desktop icon to launch the software, and then head over to Microsft PowerPoint and open the presentation you’d like to record in the second monitor. Adobe Captivate enables you to capture all animations, objects or multimedia featured in the PowerPoint presentation and it also allows you to record any on-screen activity you want.
Click on the Demo option in the Adobe Captivate’s welcome window, and then click on the Create button in the lower right corner of the screen.
Step 2 - Select the application and designate the area of the screen you’d like to record
After you click on the Create button, a new window will appear on the screen. In the upper left corner of the window, you’ll be able to see Screen Area and Application options. Select the Application feature and head over to the drop-down menu located directly below it to select the Microsoft PowerPoint application or any other app compatible with the software.
In the Snap To section of the window, you’ll be able to choose between Application Window, Application Region, and Custom Size options. Select the feature that best meets the demands of the project you are working on, and then click on the Panning drop down menu if you would like to add the panning effect to the video recording you are creating. The Audio feature lets you record both narration and system audio.
Step 3 - Starting a new video recording session
Click on the Settings button if you wish to change the destination on your hard-drive where the video will be saved.
When the new window opens, click on the Browse icon next to the Working Folder feature, and select insert the new destination folder for your video. Above the Working Folder option is the Show Mouse in Video Demo Mode checkbox, make sure it is marked if you want the mouse cursor to be visible in the video and click OK to confirm the changes you’ve made.
Hit the Record button to initiate the video recording session. You can hit the Esc or End buttons to stop recording if you are using a PC, while Mac users can perform the same action by hitting Cmd + Enter keys.
Step 4 - Publish the video
Upon the completion of the video recording session, the Publish Video Demo window will appear on the screen. You’ll be able to save your video as an MP4 file directly to your computer, or you can export the video directly to YouTube, Facebook or Twitter.
You’ll also be able to set the preferred frame rate, encoding option and aspect ratio. Click on the Publish button after you’ve adjusted all the settings in accordance with the demands of your project.
Conclusion:
Adobe Captivate is much more than just a simple screen recording tool, and if you want, you can use it to perform basic editing actions on your footage. You can also create PIP videos, add smart shapes to a video or insert text captions directly from the software. Did you find this article helpful? Do you think that recording videos with Adobe Captivate is a simple and fun process? Leave a comment and share your opinions with us.
Max Wales
Max Wales is a writer and a lover of all things video.
Follow @Max Wales
Max Wales
Mar 27, 2024• Proven solutions
The Internet has changed the way we look at education since it grants us access to unlimited amounts of knowledge. Adobe Captivate is one of the most powerful software products that enables its users to produce video presentations and interactive eLearning content with powerful authoring tools. The software is designed to reduce the amount of time you have to spend on setting up the video recording session, so you can focus on the quality of the content you are presenting.
To make things even better, the Adobe Captivate software is compatible with all documents created with Microsoft PowerPoint and in this article we are going to guide you through each step of the process of recording a video presentation using Adobe Captivate.
 HD Video Converter Factory Pro
![]()
 vMix Basic HD - Software based live production. vMix Basic HD includes 4 inputs, 3 cameras, streaming, recording, playlist.
The All-in-One Screen Recorder & Video Editor
- Record desktop screen, voiceover, and webcam simultaneously
- Edit recorded clips quickly with a wide range of professional tools
- Built-in plentiful templates and effects
- Export to MP4, MOV, MKV, GIF and multiple formats
For Win 7 or later (64-bit)
For macOS 10.12 or later
Secure Download
How to Record a Video Presentation Using Adobe Captivate
Before you can start working on your new project you first need to install the software. If you haven’t already done that, you can download Adobe Captivate by following this link. You will also have to register and activate the software in order to be able to use every option Adobe Captivate has to offer. You can find the full list of the software’s featureshere.
Step 1 - Setting up a video recording session
Double-click on Adobe Captivate’s desktop icon to launch the software, and then head over to Microsft PowerPoint and open the presentation you’d like to record in the second monitor. Adobe Captivate enables you to capture all animations, objects or multimedia featured in the PowerPoint presentation and it also allows you to record any on-screen activity you want.
 Lyric Video Creator Professional Version
Click on the Demo option in the Adobe Captivate’s welcome window, and then click on the Create button in the lower right corner of the screen.
Step 2 - Select the application and designate the area of the screen you’d like to record
After you click on the Create button, a new window will appear on the screen. In the upper left corner of the window, you’ll be able to see Screen Area and Application options. Select the Application feature and head over to the drop-down menu located directly below it to select the Microsoft PowerPoint application or any other app compatible with the software.
In the Snap To section of the window, you’ll be able to choose between Application Window, Application Region, and Custom Size options. Select the feature that best meets the demands of the project you are working on, and then click on the Panning drop down menu if you would like to add the panning effect to the video recording you are creating. The Audio feature lets you record both narration and system audio.
Step 3 - Starting a new video recording session
Click on the Settings button if you wish to change the destination on your hard-drive where the video will be saved.
When the new window opens, click on the Browse icon next to the Working Folder feature, and select insert the new destination folder for your video. Above the Working Folder option is the Show Mouse in Video Demo Mode checkbox, make sure it is marked if you want the mouse cursor to be visible in the video and click OK to confirm the changes you’ve made.
Hit the Record button to initiate the video recording session. You can hit the Esc or End buttons to stop recording if you are using a PC, while Mac users can perform the same action by hitting Cmd + Enter keys.
Step 4 - Publish the video
Upon the completion of the video recording session, the Publish Video Demo window will appear on the screen. You’ll be able to save your video as an MP4 file directly to your computer, or you can export the video directly to YouTube, Facebook or Twitter.
You’ll also be able to set the preferred frame rate, encoding option and aspect ratio. Click on the Publish button after you’ve adjusted all the settings in accordance with the demands of your project.
Conclusion:
Adobe Captivate is much more than just a simple screen recording tool, and if you want, you can use it to perform basic editing actions on your footage. You can also create PIP videos, add smart shapes to a video or insert text captions directly from the software. Did you find this article helpful? Do you think that recording videos with Adobe Captivate is a simple and fun process? Leave a comment and share your opinions with us.
Max Wales
Max Wales is a writer and a lover of all things video.
Follow @Max Wales
Max Wales
Mar 27, 2024• Proven solutions
The Internet has changed the way we look at education since it grants us access to unlimited amounts of knowledge. Adobe Captivate is one of the most powerful software products that enables its users to produce video presentations and interactive eLearning content with powerful authoring tools. The software is designed to reduce the amount of time you have to spend on setting up the video recording session, so you can focus on the quality of the content you are presenting.
To make things even better, the Adobe Captivate software is compatible with all documents created with Microsoft PowerPoint and in this article we are going to guide you through each step of the process of recording a video presentation using Adobe Captivate.
![]()
The All-in-One Screen Recorder & Video Editor
- Record desktop screen, voiceover, and webcam simultaneously
- Edit recorded clips quickly with a wide range of professional tools
- Built-in plentiful templates and effects
- Export to MP4, MOV, MKV, GIF and multiple formats
For Win 7 or later (64-bit)
For macOS 10.12 or later
Secure Download
How to Record a Video Presentation Using Adobe Captivate
Before you can start working on your new project you first need to install the software. If you haven’t already done that, you can download Adobe Captivate by following this link. You will also have to register and activate the software in order to be able to use every option Adobe Captivate has to offer. You can find the full list of the software’s featureshere.
Step 1 - Setting up a video recording session
Double-click on Adobe Captivate’s desktop icon to launch the software, and then head over to Microsft PowerPoint and open the presentation you’d like to record in the second monitor. Adobe Captivate enables you to capture all animations, objects or multimedia featured in the PowerPoint presentation and it also allows you to record any on-screen activity you want.
Click on the Demo option in the Adobe Captivate’s welcome window, and then click on the Create button in the lower right corner of the screen.
Step 2 - Select the application and designate the area of the screen you’d like to record
After you click on the Create button, a new window will appear on the screen. In the upper left corner of the window, you’ll be able to see Screen Area and Application options. Select the Application feature and head over to the drop-down menu located directly below it to select the Microsoft PowerPoint application or any other app compatible with the software.
In the Snap To section of the window, you’ll be able to choose between Application Window, Application Region, and Custom Size options. Select the feature that best meets the demands of the project you are working on, and then click on the Panning drop down menu if you would like to add the panning effect to the video recording you are creating. The Audio feature lets you record both narration and system audio.
Step 3 - Starting a new video recording session
Click on the Settings button if you wish to change the destination on your hard-drive where the video will be saved.
When the new window opens, click on the Browse icon next to the Working Folder feature, and select insert the new destination folder for your video. Above the Working Folder option is the Show Mouse in Video Demo Mode checkbox, make sure it is marked if you want the mouse cursor to be visible in the video and click OK to confirm the changes you’ve made.
Hit the Record button to initiate the video recording session. You can hit the Esc or End buttons to stop recording if you are using a PC, while Mac users can perform the same action by hitting Cmd + Enter keys.
Step 4 - Publish the video
Upon the completion of the video recording session, the Publish Video Demo window will appear on the screen. You’ll be able to save your video as an MP4 file directly to your computer, or you can export the video directly to YouTube, Facebook or Twitter.
You’ll also be able to set the preferred frame rate, encoding option and aspect ratio. Click on the Publish button after you’ve adjusted all the settings in accordance with the demands of your project.
Conclusion:
Adobe Captivate is much more than just a simple screen recording tool, and if you want, you can use it to perform basic editing actions on your footage. You can also create PIP videos, add smart shapes to a video or insert text captions directly from the software. Did you find this article helpful? Do you think that recording videos with Adobe Captivate is a simple and fun process? Leave a comment and share your opinions with us.

WPS Office Premium ( File Recovery, Photo Scanning, Convert PDF)–Yearly
Max Wales
Max Wales is a writer and a lover of all things video.
Follow @Max Wales
- Title: 2024 Approved Innovating Presentations Using Adobe Captivate
- Author: Duchess
- Created at : 2024-07-21 14:56:36
- Updated at : 2024-07-22 14:56:36
- Link: https://screen-video-capture.techidaily.com/2024-approved-innovating-presentations-using-adobe-captivate/
- License: This work is licensed under CC BY-NC-SA 4.0.