
Comprehensive Guide to Advanced Screen Capture via Adobe Captive
Comprehensive Guide to Advanced Screen Capture via Adobe Captive
Adobe Captive is a popular professional tool to create video content for software demonstrations and share them with customers and employees. Therefore, if you are looking for a professional screen recording software, Adobe Captive is a great choice. Adobe screen recorder lets you record the screen manually as well as automatically. You can record the screen as well as the webcam.
There are loads of options available for proper configuration and customization as you will expect in a professional screen recorder. You can record top-notch quality tutorials videos and software demonstration videos as well as record auditions and interviews. Here is the complete review of Adobe screen capture software named Adobe Captive.
Part 1. Key features of Adobe Captive
As a screen recorder, there is no dearth of features on Adobe Captive to record professional-quality videos. Here are the key features of Adobe recording software that matter the most while recording the screen.
Record Screen and Webcam - You can record the screen and the webcam. When you are recording your own video through webcam, you can change the background for a professional touch. Besides, you can record audio from different sources. The recording can be done at the same resolution as that of your screen.
Responsive Screen Recording - When you capture the screen with Adobe Captive, the recorded video is going to be responsive so that any user can view the video of any device seamlessly. It is quite similar to creating responsive websites that adjust as per screen size for proper display.
Capture Everything - Apart from capturing screen activities, the software captures all mouse movements, keyboard activities as well as system sound to clear the video as much perfectly as possible.
Standard Editing - Adobe screen capture software lets you edit the recorded video to add transitions, insert texts and images, draw smart shapes and highlight boxes, add voiceover and audio effects. You can add another video in Picture-in-Picture format, and you can publish your recorded and edited video on YouTube with a single click. Besides, you can add pan and zoom effects, trim video clips, and split video into different sections.
Part 2. How to Use Adobe Captive?
Adobe recording software is not a free software, and you have to register an account on Adobe and purchase the software license. Before buying the license, you should definitely go for the free trial, and if you are satisfied, you should opt for the premium subscription. So, once you have downloaded and activated Adobe screen recorder, here are the steps to follow to record the screen.
Step 1: Launch Adobe Captive. Open the application whose screen you want to record.
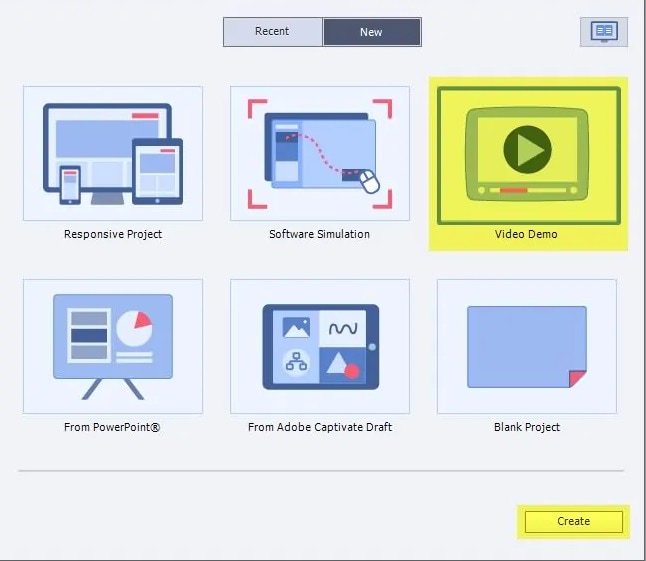
Step 2: Select Video Demo option and click on Create button.
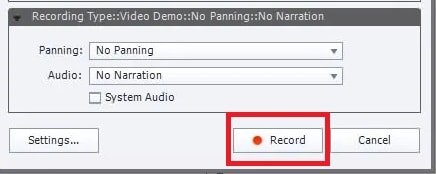
Step 3: On the next screen, there are two options available - Screen Area and Application. Go to Screen Area and select full screen or custom screen. If you want to record certain popular application such as PowerPoint, you can select that for responsive screen recording. At the bottom part, you have Adobe audio recording option to tweak as per requirements.

Step 4: Once you are done with the configurations, click on Record button.
Step 5: In order to stop recording, hit the Esc button. Mac users have to press Cmd + Enter keys together.
Part 3. Pros and Cons of Adobe Captive
Adobe Captive has its advantages as well as disadvantages. There is no doubt that Adobe audition recording is a professional screen recording software, there are certain drawbacks for which it is not an automatic choice for video creators who publish their videos on different platforms. However, it is quite popular among corporates and professionals for creating software demo. Here is the list of the pros and cons you should be aware of.
Pros
- Record screen, webcam and audio from different sources.
- Can create software simulation and demonstration.
- Different modes for specific professional requirements.
- Can insert text, objects, highlight boxes, and drawings.
- Different settings and configurations for fulfilling requirements.
Cons
- Interface is not simple and easy to use.
- Editing options are not quite advanced.
Part 4. Alternative Way To Record Videos
If you are somehow not satisfied with Adobe recording software and you want a better alternative that is easy to use and packs with more features, Filmora Video Recorder is a great choice. You can record your screen, gameplay, and webcam. Apart from live audio recording, you can add voiceover while editing.
The built-in editor is of professional quality to make the recorded video even better. That is why professional video creators who publish their illustrative and tutorial videos on different platforms prefer Filmora over Adobe Captive. Here are the steps to follow to record the screen with Filmora.
Step 1: Download and install Filmora and launch it on your computer.
For Win 7 or later (64-bit)
For macOS 10.12 or later
Step 2: Click on PC Screen option from the upper right corner.

Step 3: Select the screen size and configure the audio sources. Click on the Record button to start recording.

You will get a few seconds to set up your screen that you want to record. To stop recording, you can click on Stop button, and you can preview the recording and save it on your drive. You can always go for editing any time you want before publishing the video.
Conclusion
Adobe screen recorder is a professional software for creating video presentations and tutorial videos. The software is widely used by professionals, and there are standard and advanced features available for recording the screen. However, getting used to the software takes some time, and the editing features are not that advanced. If you are looking for a better alternative, Wondershare Filmora is the best option.
Cons
- Interface is not simple and easy to use.
- Editing options are not quite advanced.
Part 4. Alternative Way To Record Videos
If you are somehow not satisfied with Adobe recording software and you want a better alternative that is easy to use and packs with more features, Filmora Video Recorder is a great choice. You can record your screen, gameplay, and webcam. Apart from live audio recording, you can add voiceover while editing.
The built-in editor is of professional quality to make the recorded video even better. That is why professional video creators who publish their illustrative and tutorial videos on different platforms prefer Filmora over Adobe Captive. Here are the steps to follow to record the screen with Filmora.
Step 1: Download and install Filmora and launch it on your computer.
For Win 7 or later (64-bit)
For macOS 10.12 or later
Step 2: Click on PC Screen option from the upper right corner.
Step 3: Select the screen size and configure the audio sources. Click on the Record button to start recording.
You will get a few seconds to set up your screen that you want to record. To stop recording, you can click on Stop button, and you can preview the recording and save it on your drive. You can always go for editing any time you want before publishing the video.
Conclusion
Adobe screen recorder is a professional software for creating video presentations and tutorial videos. The software is widely used by professionals, and there are standard and advanced features available for recording the screen. However, getting used to the software takes some time, and the editing features are not that advanced. If you are looking for a better alternative, Wondershare Filmora is the best option.
Also read:
- [New] 2024 Approved HP Laptop Tips for Perfect Screen Recordings
- [New] 2024 Approved Ultimate Race Realism 5 Favorites
- [New] Essential Techniques for Efficient Utilization of Zoom's Whiteboard Feature for 2024
- [Updated] EasyCapture Pro - Free for Windows 10 for 2024
- [Updated] Immediate Cessation of Live Streaming in QuickTime
- [Updated] In 2024, Honorable 5 Quicktime Frame Recorder
- [Updated] One-by-One Instagram Showcase
- [Updated] Premier Virtual Microphones
- Capturing Clarity Web-Based High-Definition Recorders
- Expert Insights on Navigating Google Duo and Its Capabilities
- In 2024, Preventing Photo Glitches on Windows 10 A Quick Guide
- In 2024, Two Ways to Track My Boyfriends Vivo Y78t without Him Knowing | Dr.fone
- Samsung 860 EVO SSD Driver Download: Step-by-Step Guide
- Seamless Collaboration: Using Google Drive for Microsoft Office File Management
- WhatsApp Narratives The Sound Factor for 2024
- Title: Comprehensive Guide to Advanced Screen Capture via Adobe Captive
- Author: Duchess
- Created at : 2024-11-23 19:51:04
- Updated at : 2024-11-28 21:14:27
- Link: https://screen-video-capture.techidaily.com/comprehensive-guide-to-advanced-screen-capture-via-adobe-captive/
- License: This work is licensed under CC BY-NC-SA 4.0.