
"In 2024, Breaking Down Live Mastering Four Fundamental Recording Techniques"
Breaking Down Live: Mastering Four Fundamental Recording Techniques
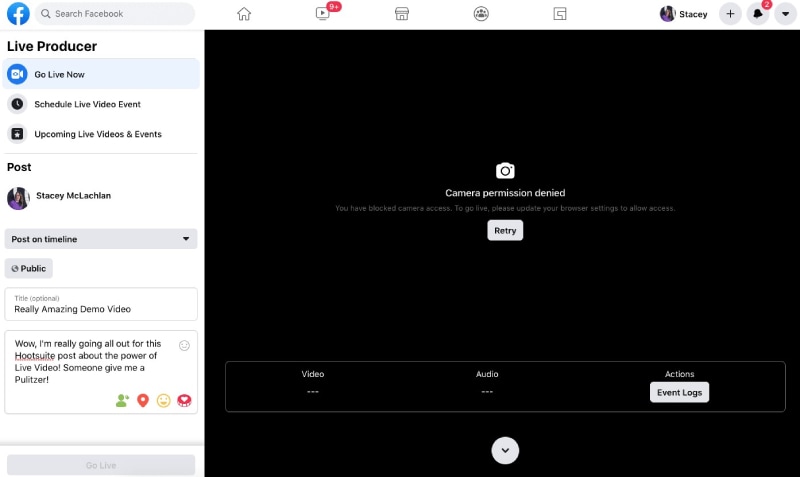
Some Facebook users search for a good screen recorder to record their favorite Facebook Live videos. Bloggers, influencers, gamers, online vendors, online instructors, musicians, and others utilize this function. Facebook Live is a popular feature of the social media platform that enables users to stream live videos with any material. Additionally, Facebook Live has become a platform for businesses to market their services. However, Facebook does not allow users to download Facebook Live.
Facebook is one of the most widely used and largest social media platforms. Almost all of your friends, relatives, and loved ones use it daily to interact and socialize. When you’re having a video chat with your friends and individuals you adore, you may wish to record the lovely and humorous moments. Although Facebook doesn’t have an in-built recording tool, that doesn’t mean it’s impossible to fulfill this wish. Whether you wish to record Facebook videos on your PC, iPhone, iPad, Android, or Mac, this post will clear up any doubts you may have.
Way 1. How to Record Facebook Live On PC
Facebook Live has become a sensation in today’s connected, live-streaming society. From celebrities to close friends, politicians to singers, and everyone in between, anybody may stream directly from their smartphone camera. While Facebook Live broadcasts are in real-time, individuals who view them are limited to the access that their favorite broadcasters grant. Filmora Video Recorder is the only method to make high-quality recordings from Facebook Live videos, allowing you to enjoy live streaming moments on any device, at any time, even after they’ve been deleted.
For Windows users, employing a strong screen recorder like Filmora Screen Recorder, which captures video on Windows 10, 8, and 7, is likely the most convenient option to record a Facebook video chat. It is unquestionably free and secure to use. It allows you to record Facebook video calls indefinitely.
For Win 7 or later (64-bit)
For macOS 10.12 or later

Steps to Record Facebook Stream on PC
**Step 1. Install the Software:
On your desktop or laptop computer, launch Filmora Video Capture for Mac or Filmora Video Capture for PC. A fast control bar will appear once you open Screen Recorder on your PC. Simply create some pre-recording settings, ensuring that you wish to record system sound, mouse clicks, and microphone all at the same time. To create more specific settings, go to Recording Settings and adjust the video size, format, and frame rate, among other things.

**Step 2. Open Facebook:
Go to Facebook and search for the Live broadcast you wish to record, either via your News Feed or the broadcaster’s page.
**Step 3. Start Recording:
All you have to do now is press Record on Filmora Video Capture to discover the Facebook Live video window in your browser.

**Step 4. Stop Recording:
When the recording is complete, all recorded videos will appear in the video list. You may get a preview of them and make changes to them. You can also select the video and upload it to popular social media sites by clicking the right mouse button.
Way 2. How to Record Facebook Stream on Mac
You may utilize online and downloaded programs in addition to the built-in choices to capture a streaming video on your Mac. These are particularly useful if you want professional-looking quality or certain functionality. QuickTime Player is another simple screen recording application that might let you easily record a Facebook video chat. Well, it’s still simple, and you won’t have to download any software. QuickTime Player, which comes with your Mac for free, will suffice.
Steps to Record Facebook Stream on MacBook
To create it, follow these easy steps:
**Step 1: On your Mac, launch QuickTime Player. It may be found in the Application folder. Choose New Screen Recording from the menu bar after pulling down the File menu. The Screen Recording window will appear after that.
**Step 2: To set up recording settings, click the arrow next to the red button before beginning your recording. Then go to Facebook and start a video conversation there. You may start recording the complete screen by clicking anywhere on the screen or dragging to choose an area to record, then click Start Recording.
 WinUtilities Pro
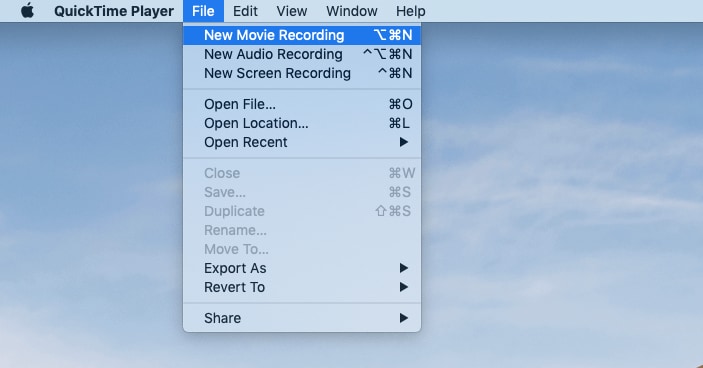
**Step 3: To stop the recording, press Command, Control, and Esc or click the Stop button in the menu bar. It will then open your recording on its own. You have the option of viewing, editing, or sharing it.
 CalendarBudget - Monthly subscription membership to CalendarBudget via web browser or mobile app. Support included.
 Way 3. How to Record Facebook Live on iPhone
Screencasts on iOS devices, such as the iPhone and iPad, are often done through third-party applications. However, for those who prefer a more direct method, the iOS 11 or 12 versions have a handy built-in screen recording option. However, before you can utilize this function, you must first enable it. You’ve come to the correct spot if you’re wondering how to record Facebook videos on your iPhone. We’ll now look at how you can do each of these tasks with ease. We’ll be utilizing an app for that. Instead of going through the app’s features, we’ll go right into the steps.
Steps to Record on iPhone
We’ll look at how to enable the feature and make the most of it in this article:
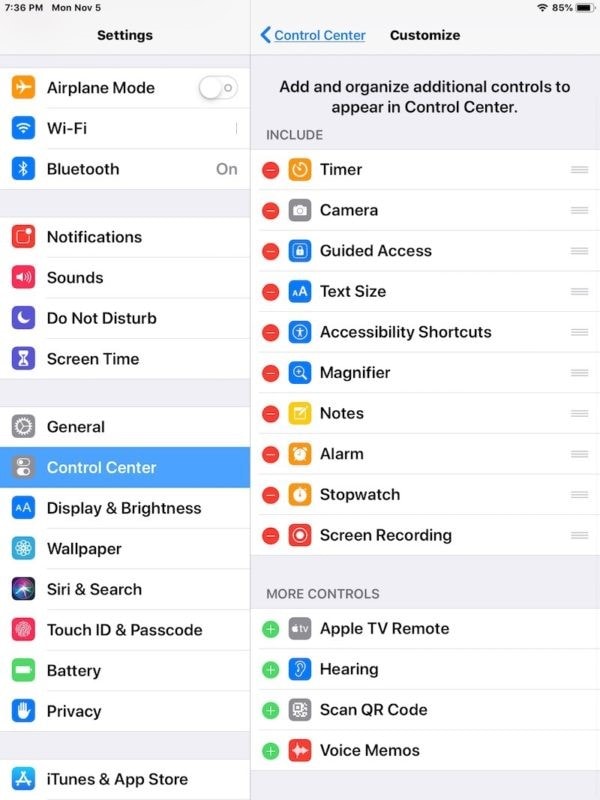
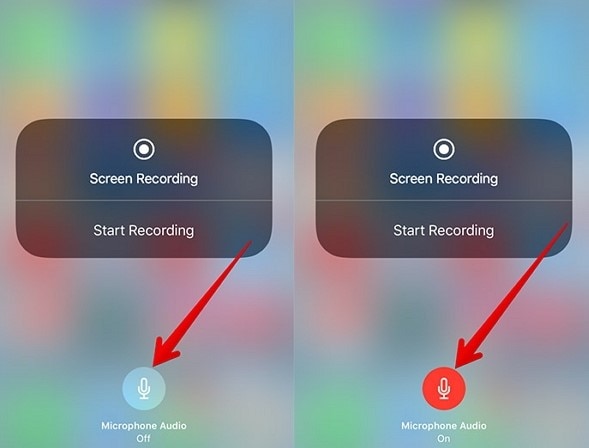
Step 1: Enabling the Screen Recording Option
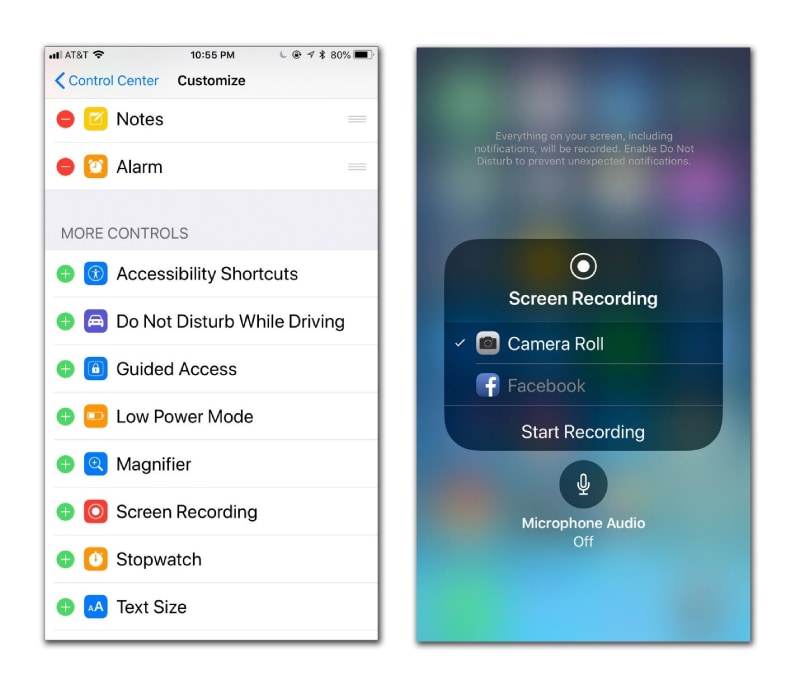
Check that the screen recording capability is accessible in the control center before utilizing it. You must activate this symbol if you do not see it. On your iOS device, open the Settings app. Select Control Center and then Customized Controls from the drop-down menu. Scroll down to the Screen Recording option and touch the green (+) icon to the left of it; this will add the feature to the Control Center and make it visible in the Include section above. You may now quit the settings app with the screen recording function turned on. It’s now time to put the feature to use.
Step 2: Making Use of the Screen Recorder
Open the Control Center by swiping down from the top-right of the screen for devices without a home button and up from the bottom of the screen for devices with a home button.

Step 3: Start/Stop Recording
Press the Recording Button on the Screen: The button is shaped like an (O) or a circle. The function will be turned on after a countdown from 3 to 1.
 vMix HD - Software based live production. vMix HD includes everything in vMix Basic HD plus 1000 inputs, Video List, 4 Overlay Channels, and 1 vMix Call
Way 4. How to Record Facebook Live on Android
AZ Screen Recorder is one of the finest Android applications for easily recording Facebook live streams. This program is simple to use, and it displays an overlay button on your screen that does not interfere with the recording. Apart from Facebook, this program can also capture YouTube live streams and other internet media. In reality, this program has a built-in video editor that lets you trim, crop, resize, zoom in and out, and chop videos. While shooting Facebook Live in real-time, you may also incorporate your front camera. It can record your Android screen without a time restriction or watermarks. On the other hand, we’ll teach you how to utilize this tool in the next sections.
Steps to Record on Android
Step 1. After you’ve installed the program, go to Facebook and search for the live video you want to record, begin it, and you’ll see a little camera icon on the left side of your screen.
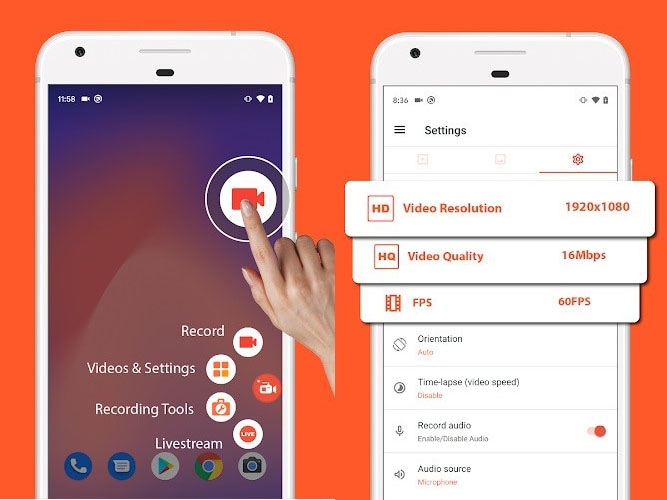
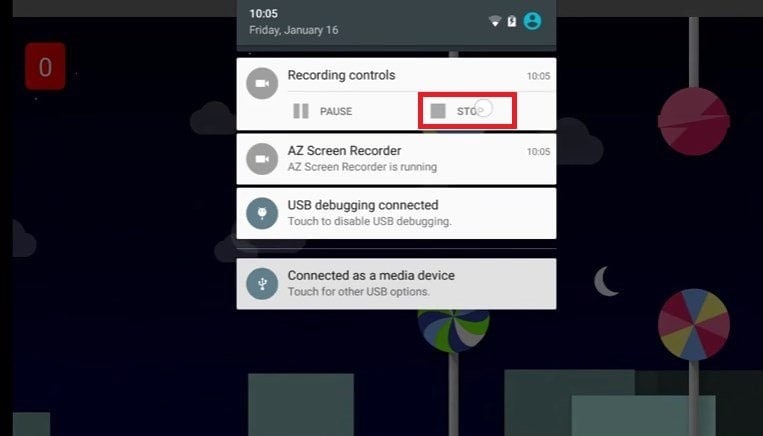
Step 2. To reveal the AZ Screen Recorder’s buttons, tap on that icon. To begin recording, just press the “Record” button. To terminate the recording process, pull down the notification screen and hit the “Stop” button.
Step 3. You may view the video by pressing the “Record” button again and selecting “File Manager” from the drop-down menu.
Conclusion
You may record anything using the same method. As a result, we’ve also addressed how to record Facebook Messenger video chats using this. You may certainly follow the instructions, and everything will be documented. That’s all there is to it. You may utilize a free screen recorder if you need a screen recorder right now to write a lesson. Now that you’ve seen several amazing Facebook recording software alternatives, give them a go and let us know which one has become a permanent fixture on your Facebook page.
For macOS 10.12 or later
Steps to Record Facebook Stream on PC
**Step 1. Install the Software:
On your desktop or laptop computer, launch Filmora Video Capture for Mac or Filmora Video Capture for PC. A fast control bar will appear once you open Screen Recorder on your PC. Simply create some pre-recording settings, ensuring that you wish to record system sound, mouse clicks, and microphone all at the same time. To create more specific settings, go to Recording Settings and adjust the video size, format, and frame rate, among other things.
**Step 2. Open Facebook:
Go to Facebook and search for the Live broadcast you wish to record, either via your News Feed or the broadcaster’s page.
 DEX 3 RE is Easy-To-Use DJ Mixing Software for MAC and Windows Designed for Today’s Versatile DJ.
Mix from your own library of music, iTunes or use the Pulselocker subsciprtion service for in-app access to over 44 million songs. Use with over 85 supported DJ controllers or mix with a keyboard and mouse.
DEX 3 RE is everything you need without the clutter - the perfect 2-deck mixing software solution for mobile DJs or hard-core hobbiests.
PCDJ DEX 3 RE (DJ Software for Win & MAC - Product Activation For 3 Machines)
**Step 3. Start Recording:
All you have to do now is press Record on Filmora Video Capture to discover the Facebook Live video window in your browser.
**Step 4. Stop Recording:
When the recording is complete, all recorded videos will appear in the video list. You may get a preview of them and make changes to them. You can also select the video and upload it to popular social media sites by clicking the right mouse button.
Way 2. How to Record Facebook Stream on Mac
You may utilize online and downloaded programs in addition to the built-in choices to capture a streaming video on your Mac. These are particularly useful if you want professional-looking quality or certain functionality. QuickTime Player is another simple screen recording application that might let you easily record a Facebook video chat. Well, it’s still simple, and you won’t have to download any software. QuickTime Player, which comes with your Mac for free, will suffice.
Steps to Record Facebook Stream on MacBook
To create it, follow these easy steps:
**Step 1: On your Mac, launch QuickTime Player. It may be found in the Application folder. Choose New Screen Recording from the menu bar after pulling down the File menu. The Screen Recording window will appear after that.
**Step 2: To set up recording settings, click the arrow next to the red button before beginning your recording. Then go to Facebook and start a video conversation there. You may start recording the complete screen by clicking anywhere on the screen or dragging to choose an area to record, then click Start Recording.
**Step 3: To stop the recording, press Command, Control, and Esc or click the Stop button in the menu bar. It will then open your recording on its own. You have the option of viewing, editing, or sharing it.

Way 3. How to Record Facebook Live on iPhone
Screencasts on iOS devices, such as the iPhone and iPad, are often done through third-party applications. However, for those who prefer a more direct method, the iOS 11 or 12 versions have a handy built-in screen recording option. However, before you can utilize this function, you must first enable it. You’ve come to the correct spot if you’re wondering how to record Facebook videos on your iPhone. We’ll now look at how you can do each of these tasks with ease. We’ll be utilizing an app for that. Instead of going through the app’s features, we’ll go right into the steps.
Steps to Record on iPhone
We’ll look at how to enable the feature and make the most of it in this article:
Step 1: Enabling the Screen Recording Option
Check that the screen recording capability is accessible in the control center before utilizing it. You must activate this symbol if you do not see it. On your iOS device, open the Settings app. Select Control Center and then Customized Controls from the drop-down menu. Scroll down to the Screen Recording option and touch the green (+) icon to the left of it; this will add the feature to the Control Center and make it visible in the Include section above. You may now quit the settings app with the screen recording function turned on. It’s now time to put the feature to use.
Step 2: Making Use of the Screen Recorder
Open the Control Center by swiping down from the top-right of the screen for devices without a home button and up from the bottom of the screen for devices with a home button.
Step 3: Start/Stop Recording
Press the Recording Button on the Screen: The button is shaped like an (O) or a circle. The function will be turned on after a countdown from 3 to 1.

WPS Office Premium ( File Recovery, Photo Scanning, Convert PDF)–Yearly
Way 4. How to Record Facebook Live on Android
AZ Screen Recorder is one of the finest Android applications for easily recording Facebook live streams. This program is simple to use, and it displays an overlay button on your screen that does not interfere with the recording. Apart from Facebook, this program can also capture YouTube live streams and other internet media. In reality, this program has a built-in video editor that lets you trim, crop, resize, zoom in and out, and chop videos. While shooting Facebook Live in real-time, you may also incorporate your front camera. It can record your Android screen without a time restriction or watermarks. On the other hand, we’ll teach you how to utilize this tool in the next sections.
Steps to Record on Android
Step 1. After you’ve installed the program, go to Facebook and search for the live video you want to record, begin it, and you’ll see a little camera icon on the left side of your screen.
Step 2. To reveal the AZ Screen Recorder’s buttons, tap on that icon. To begin recording, just press the “Record” button. To terminate the recording process, pull down the notification screen and hit the “Stop” button.
Step 3. You may view the video by pressing the “Record” button again and selecting “File Manager” from the drop-down menu.
Conclusion
You may record anything using the same method. As a result, we’ve also addressed how to record Facebook Messenger video chats using this. You may certainly follow the instructions, and everything will be documented. That’s all there is to it. You may utilize a free screen recorder if you need a screen recorder right now to write a lesson. Now that you’ve seen several amazing Facebook recording software alternatives, give them a go and let us know which one has become a permanent fixture on your Facebook page.
For macOS 10.12 or later
Steps to Record Facebook Stream on PC
**Step 1. Install the Software:
On your desktop or laptop computer, launch Filmora Video Capture for Mac or Filmora Video Capture for PC. A fast control bar will appear once you open Screen Recorder on your PC. Simply create some pre-recording settings, ensuring that you wish to record system sound, mouse clicks, and microphone all at the same time. To create more specific settings, go to Recording Settings and adjust the video size, format, and frame rate, among other things.
**Step 2. Open Facebook:
Go to Facebook and search for the Live broadcast you wish to record, either via your News Feed or the broadcaster’s page.
**Step 3. Start Recording:
All you have to do now is press Record on Filmora Video Capture to discover the Facebook Live video window in your browser.
**Step 4. Stop Recording:
When the recording is complete, all recorded videos will appear in the video list. You may get a preview of them and make changes to them. You can also select the video and upload it to popular social media sites by clicking the right mouse button.

Way 2. How to Record Facebook Stream on Mac
You may utilize online and downloaded programs in addition to the built-in choices to capture a streaming video on your Mac. These are particularly useful if you want professional-looking quality or certain functionality. QuickTime Player is another simple screen recording application that might let you easily record a Facebook video chat. Well, it’s still simple, and you won’t have to download any software. QuickTime Player, which comes with your Mac for free, will suffice.
Steps to Record Facebook Stream on MacBook
To create it, follow these easy steps:
**Step 1: On your Mac, launch QuickTime Player. It may be found in the Application folder. Choose New Screen Recording from the menu bar after pulling down the File menu. The Screen Recording window will appear after that.
**Step 2: To set up recording settings, click the arrow next to the red button before beginning your recording. Then go to Facebook and start a video conversation there. You may start recording the complete screen by clicking anywhere on the screen or dragging to choose an area to record, then click Start Recording.
**Step 3: To stop the recording, press Command, Control, and Esc or click the Stop button in the menu bar. It will then open your recording on its own. You have the option of viewing, editing, or sharing it.
Way 3. How to Record Facebook Live on iPhone
Screencasts on iOS devices, such as the iPhone and iPad, are often done through third-party applications. However, for those who prefer a more direct method, the iOS 11 or 12 versions have a handy built-in screen recording option. However, before you can utilize this function, you must first enable it. You’ve come to the correct spot if you’re wondering how to record Facebook videos on your iPhone. We’ll now look at how you can do each of these tasks with ease. We’ll be utilizing an app for that. Instead of going through the app’s features, we’ll go right into the steps.
Steps to Record on iPhone
We’ll look at how to enable the feature and make the most of it in this article:
Step 1: Enabling the Screen Recording Option
Check that the screen recording capability is accessible in the control center before utilizing it. You must activate this symbol if you do not see it. On your iOS device, open the Settings app. Select Control Center and then Customized Controls from the drop-down menu. Scroll down to the Screen Recording option and touch the green (+) icon to the left of it; this will add the feature to the Control Center and make it visible in the Include section above. You may now quit the settings app with the screen recording function turned on. It’s now time to put the feature to use.
Step 2: Making Use of the Screen Recorder
Open the Control Center by swiping down from the top-right of the screen for devices without a home button and up from the bottom of the screen for devices with a home button.
Step 3: Start/Stop Recording
Press the Recording Button on the Screen: The button is shaped like an (O) or a circle. The function will be turned on after a countdown from 3 to 1.
Way 4. How to Record Facebook Live on Android
AZ Screen Recorder is one of the finest Android applications for easily recording Facebook live streams. This program is simple to use, and it displays an overlay button on your screen that does not interfere with the recording. Apart from Facebook, this program can also capture YouTube live streams and other internet media. In reality, this program has a built-in video editor that lets you trim, crop, resize, zoom in and out, and chop videos. While shooting Facebook Live in real-time, you may also incorporate your front camera. It can record your Android screen without a time restriction or watermarks. On the other hand, we’ll teach you how to utilize this tool in the next sections.
Steps to Record on Android
Step 1. After you’ve installed the program, go to Facebook and search for the live video you want to record, begin it, and you’ll see a little camera icon on the left side of your screen.
Step 2. To reveal the AZ Screen Recorder’s buttons, tap on that icon. To begin recording, just press the “Record” button. To terminate the recording process, pull down the notification screen and hit the “Stop” button.
 NeoDownloader - Fast and fully automatic image/video/music downloader.
Step 3. You may view the video by pressing the “Record” button again and selecting “File Manager” from the drop-down menu.
 Power Tools add-on for Google Sheets, 12-month subscription
Conclusion
You may record anything using the same method. As a result, we’ve also addressed how to record Facebook Messenger video chats using this. You may certainly follow the instructions, and everything will be documented. That’s all there is to it. You may utilize a free screen recorder if you need a screen recorder right now to write a lesson. Now that you’ve seen several amazing Facebook recording software alternatives, give them a go and let us know which one has become a permanent fixture on your Facebook page.
For macOS 10.12 or later
 Project Manager - Asset Browser for 3Ds Max
Steps to Record Facebook Stream on PC
**Step 1. Install the Software:
On your desktop or laptop computer, launch Filmora Video Capture for Mac or Filmora Video Capture for PC. A fast control bar will appear once you open Screen Recorder on your PC. Simply create some pre-recording settings, ensuring that you wish to record system sound, mouse clicks, and microphone all at the same time. To create more specific settings, go to Recording Settings and adjust the video size, format, and frame rate, among other things.
**Step 2. Open Facebook:
Go to Facebook and search for the Live broadcast you wish to record, either via your News Feed or the broadcaster’s page.
**Step 3. Start Recording:
All you have to do now is press Record on Filmora Video Capture to discover the Facebook Live video window in your browser.
**Step 4. Stop Recording:
When the recording is complete, all recorded videos will appear in the video list. You may get a preview of them and make changes to them. You can also select the video and upload it to popular social media sites by clicking the right mouse button.
Way 2. How to Record Facebook Stream on Mac
You may utilize online and downloaded programs in addition to the built-in choices to capture a streaming video on your Mac. These are particularly useful if you want professional-looking quality or certain functionality. QuickTime Player is another simple screen recording application that might let you easily record a Facebook video chat. Well, it’s still simple, and you won’t have to download any software. QuickTime Player, which comes with your Mac for free, will suffice.
Steps to Record Facebook Stream on MacBook
To create it, follow these easy steps:
**Step 1: On your Mac, launch QuickTime Player. It may be found in the Application folder. Choose New Screen Recording from the menu bar after pulling down the File menu. The Screen Recording window will appear after that.
**Step 2: To set up recording settings, click the arrow next to the red button before beginning your recording. Then go to Facebook and start a video conversation there. You may start recording the complete screen by clicking anywhere on the screen or dragging to choose an area to record, then click Start Recording.
 Screensaver Factory, Create stunning professional screensavers within minutes. Create screensavers for yourself, for marketing or unlimited royalty-free commercial distribution. Make screensavers from images, video and swf flash, add background music and smooth sprite and transition effects. Screensaver Factory is very easy to use, and it enables you to make self-installing screensaver files and CDs for easy setup and distribution. Screensaver Factory is the most advanced software of its kind.
**Step 3: To stop the recording, press Command, Control, and Esc or click the Stop button in the menu bar. It will then open your recording on its own. You have the option of viewing, editing, or sharing it.
Way 3. How to Record Facebook Live on iPhone
Screencasts on iOS devices, such as the iPhone and iPad, are often done through third-party applications. However, for those who prefer a more direct method, the iOS 11 or 12 versions have a handy built-in screen recording option. However, before you can utilize this function, you must first enable it. You’ve come to the correct spot if you’re wondering how to record Facebook videos on your iPhone. We’ll now look at how you can do each of these tasks with ease. We’ll be utilizing an app for that. Instead of going through the app’s features, we’ll go right into the steps.
Steps to Record on iPhone
We’ll look at how to enable the feature and make the most of it in this article:
Step 1: Enabling the Screen Recording Option
Check that the screen recording capability is accessible in the control center before utilizing it. You must activate this symbol if you do not see it. On your iOS device, open the Settings app. Select Control Center and then Customized Controls from the drop-down menu. Scroll down to the Screen Recording option and touch the green (+) icon to the left of it; this will add the feature to the Control Center and make it visible in the Include section above. You may now quit the settings app with the screen recording function turned on. It’s now time to put the feature to use.
Step 2: Making Use of the Screen Recorder
Open the Control Center by swiping down from the top-right of the screen for devices without a home button and up from the bottom of the screen for devices with a home button.
Step 3: Start/Stop Recording
Press the Recording Button on the Screen: The button is shaped like an (O) or a circle. The function will be turned on after a countdown from 3 to 1.
Way 4. How to Record Facebook Live on Android
AZ Screen Recorder is one of the finest Android applications for easily recording Facebook live streams. This program is simple to use, and it displays an overlay button on your screen that does not interfere with the recording. Apart from Facebook, this program can also capture YouTube live streams and other internet media. In reality, this program has a built-in video editor that lets you trim, crop, resize, zoom in and out, and chop videos. While shooting Facebook Live in real-time, you may also incorporate your front camera. It can record your Android screen without a time restriction or watermarks. On the other hand, we’ll teach you how to utilize this tool in the next sections.
Steps to Record on Android
Step 1. After you’ve installed the program, go to Facebook and search for the live video you want to record, begin it, and you’ll see a little camera icon on the left side of your screen.
Step 2. To reveal the AZ Screen Recorder’s buttons, tap on that icon. To begin recording, just press the “Record” button. To terminate the recording process, pull down the notification screen and hit the “Stop” button.
Step 3. You may view the video by pressing the “Record” button again and selecting “File Manager” from the drop-down menu.

Conclusion
You may record anything using the same method. As a result, we’ve also addressed how to record Facebook Messenger video chats using this. You may certainly follow the instructions, and everything will be documented. That’s all there is to it. You may utilize a free screen recorder if you need a screen recorder right now to write a lesson. Now that you’ve seen several amazing Facebook recording software alternatives, give them a go and let us know which one has become a permanent fixture on your Facebook page.
- Title: In 2024, Breaking Down Live Mastering Four Fundamental Recording Techniques
- Author: Duchess
- Created at : 2024-07-21 14:00:45
- Updated at : 2024-07-22 14:00:45
- Link: https://screen-video-capture.techidaily.com/in-2024-breaking-down-live-mastering-four-fundamental-recording-techniques/
- License: This work is licensed under CC BY-NC-SA 4.0.