
:max_bytes(150000):strip_icc():format(webp)/the-17-best-graphic-design-software-2024-1dd6c15b34124b25b65e4b096e4e6ba4.jpg)
"In 2024, Real-Time Video Broadcasting Your MS Channel"
Real-Time Video Broadcasting: Your MS Channel
A Complete Guide to Recording, Sharing and Managing Videos with Microsoft Stream

Max Wales
Mar 27, 2024• Proven solutions
The way businesses communicate internally has changed drastically over the last few decades. The Enterprise video market’s current size exceeds $16 billion and it is expected to reach $40 billion by 2022. These numbers show that communication through videos is becoming increasingly popular in business contexts and that their significance for the success of a business is going to continue rising in the foreseeable future.
In April 2015 Microsoft has launched Office 365 Video , a video sharing platform that has been replaced by Microsoft Stream just two years later. Both platforms are a part of Microsoft’s mission to provide organizations of all sizes with a safe place to share their videos. If you would like to find out more about the Microsoft Stream, you’ve come to the right place, because in this guide we are going to provide you with all the information you’ll need to record, upload, and manage videos on Microsoft Stream.

- Part 1: What is Microsoft Stream?
- Part 2: What Can I Do with Microsoft Stream?
- Part 3: How to Use Microsoft Stream?
- Part 4: How to Record Videos in Microsoft Stream?
- Part 5: How to Upload Videos in Microsoft Stream?
- Part 6: How to Manage Videos in Microsoft Stream?
![]()

The All-in-One Screen Recorder & Video Editor
- Record desktop screen, voiceover, and webcam simultaneously
- Edit recorded clips quickly with a wide range of professional tools
- Built-in plentiful templates and effects
- Export to MP4, MOV, MKV, GIF and multiple formats
For Win 7 or later (64-bit)
For macOS 10.12 or later
 Secure Download
What is Microsoft Stream?
Microsoft Stream is a corporate web-based YouTube-like platform that enables companies to easily share their videos online and protect their privacy at the same time. You can either use it as a stand-alone web-based application or through the Office 365 Video Enterprise subscription.
Microsoft Stream is designed to help organizations, upload, share, and manage large amounts of video files from one place. However, broadcasting live corporate events, webinars or staff training sessions is not yet possible on Microsoft stream, while the maximum video storage for a single user is limited to 500 GB. Signing up and creating an account is free, but you’ll have to choose a monthly plan to use the platform on an ongoing basis.

What Can I Do with Microsoft Stream?
Setting up an account on Microsoft Stream is a straightforward process that will take just a couple of minutes. After you’ve created an account, you will be able to record, upload and share videos, insert metadata, manage videos, or gain access to advanced video search options.
1. Uploading videos and adding the metadata
Microsoft Stream allows its users to upload video files in bulks or one by one and it offers support for a wide range of video file formats, including some of the most frequently used file types such as MOV, AVI, MP4, or FLV. When you upload a video you can also change its title, select a thumbnail, add hashtags, and edit all other metadata of your videos from within the platform. The portal automatically converts all of the files you upload to Microsoft Stream and optimizes them for viewing on all devices.
2. Managing videos
Users can organize their videos thematically, or in any other way through video channels, like on YouTube, and they can also subscribe to channels so they don’t miss the latest uploads. Creating a watchlist that is displayed on your homepage is also an option Stream provides, so you can make your selection of videos.
3. Sharing videos
Once you’ve uploaded a video to a Microsoft Stream account, you can set its privacy settings to public or private. The platform also enables you to assign videos to multiple channels or groups of viewers of your choosing. Companies can share their videos internally via links, embed codes, or emails that enable the recipients to watch password-protected videos on different platforms.
4. Searching Videos
The metadata improves a video’s searchability as well as its availability to the Stream’s users. Titles, hashtags, and meta descriptions can be used as search terms, but keep in mind that you’ll only be able to view public videos.
How to Use Microsoft Stream?
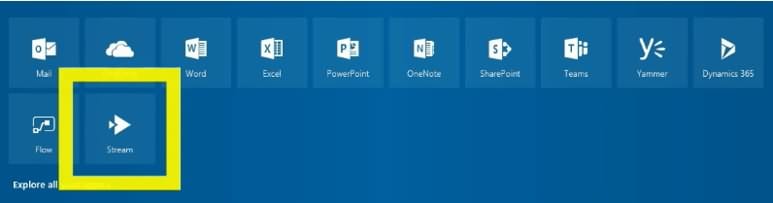
Before you go ahead and upload your first video to Microsoft Stream, there are just a few more things you should know. The owners of the Office 365 Video account, can access Stream from their accounts, by clicking on the ‘Explore all your apps’ feature and selecting it from the menu. Alternatively, you can create an account on the Microsoft Stream platform, and enjoy the 90 days of the free trial period. Monthly subscriptions for Stream vary between $3 and $5 depending on the pricing plan you’ve selected.
At the moment, there are no Android or iOS apps for Stream, but this doesn’t mean you can’t view videos on this platform from any web browser on any device, including Mac and PCs or Smartphones. You’ll need a 64-bit Windows 7 or later OS if you want to use Microsoft Stream from a PC, while Mac owners must have 64-bit Mac OS 10.11 or later installed on their devices to use this platform.
Here’s how you can record, upload, and manage videos with Microsoft Stream.
How to Record Videos in Microsoft Stream?
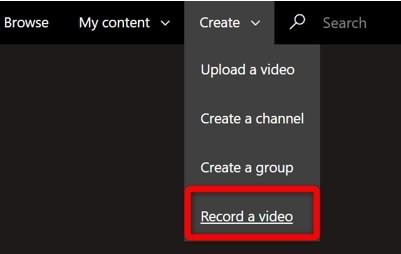
Capturing videos with Microsoft Stream requires you to install the inbuilt screen recorder on your computer. You can accomplish this by clicking on the Create menu and selecting the Record a Video option from your account.
Choose the version of the screen recorder that is optimized for the OS you’re using and complete the installation process. This is a one-time procedure and you’ll be able to launch the Stream’s screen recorder from your account for each new session.
Step 1 - Launching the Screen Recorder
To initiate the screencast, you’ll have to repeat the steps you took to install the screen recorder on your computer, so just click on the Create menu, once more and then pick the Record a Video feature from the list.
Step 2 - Adjusting the video settings
Once the screen recorder loads, you’ll be able to select the area of the screen you want to capture, record audio from an external device, and record system audio.
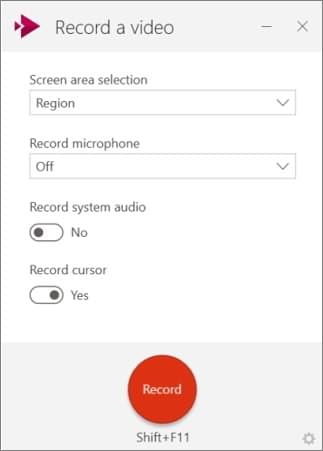
The limited scope of screen recording features also includes the system audio recording option and the feature that enables you to record the movement of your cursor. Don’t start recording before you’ve adjusted all the settings following the demands of the video you’re working on. Hold the Shift + F11 buttons to start recording or click on the big red Record button.
Step 3 - Screencasting with Microsoft Stream
During the screen capturing session, you can mute the video or cancel the process. You can’t capture footage with a webcam with Microsoft’s Stream desktop capturing tool and you can’t draw on screen or use any of the advanced tools for screencasting.

There are no limitations on the duration of your videos, but longer videos are often bigger and they take more time to upload to the platform. You can stop recording by clicking on the Record button.
Step 4 - Post Processing
Immediately after the recording is finished, you’ll be able to preview the video, but Microsoft Stream doesn’t offer even the basic video editing tools. If you want to edit a video, you’ll have to use some other software, and you’ll have to upload a video from your Stream account. Users that don’t want to edit their videos can proceed to upload the content to a group or a channel they are managing.
How to Upload Videos in Microsoft Stream?
The process of uploading videos to this platform may be time-consuming if you are uploading more than just one video, but it is by no means difficult. However, the steps you’ll need to take to upload a video depending on where on the portal you want to upload your video. Here’s how you can upload videos to Microsoft Stream in just a few steps.
Step 1 - Selecting the videos
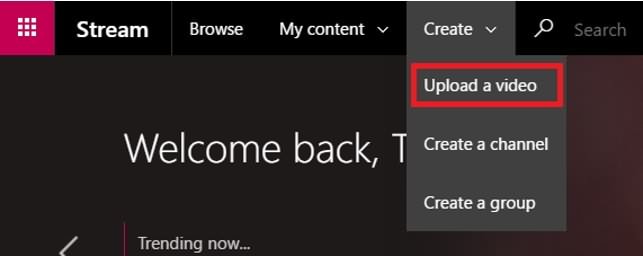
Head over to the Create menu, and click on the Upload a Video option. This action will enable you to browse the folders on the hard-drive and pick the files you want to upload. Alternatively, you can just drag and drop the video at the specified location on the Stream platform.
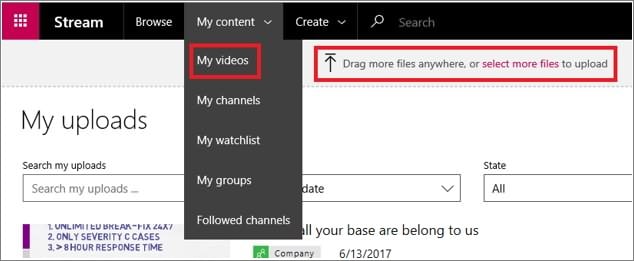
Step 2 - Uploading a video to My Videos Page
Click on the My Content menu, that is located next to Create menu, and select the My Videos option. Drag the files you want to upload to the designated area and drop them to start the upload.
You can also search for videos you already uploaded or alter the search criteria. Wait for the videos to be uploaded and then proceed to add a title, metadata, or even subtitles.
Step 3 - Uploading Videos to a Group or a Channel
If you would like to add a video to a Group on the Microsoft Stream portal, simply open the group and drag and drop the file to the designated place.
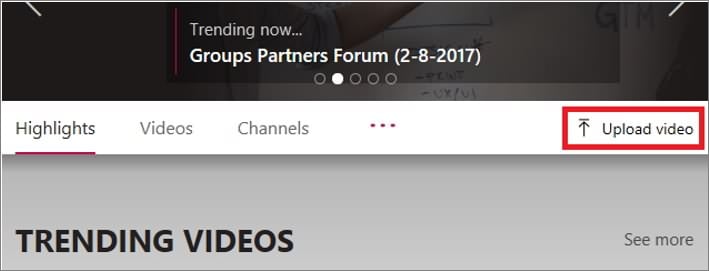
You can either upload a video from the group’s the Highlights or Videos tab, and the videos will become available in the group after the upload is complete.
Microsoft Stream users who want to add a new video to a channel, just have to navigate to the channel to which they wish to contribute and click on the Select More Files option.
Step 4 - Adding Metadata
This step of the video uploading process is important because if done correctly, it increases the video’s chances to appear high in the search rankings.
Descriptions and Titles
Naming videos and adding a brief description that sums up what goes on in them will help other Stream’s users to find them faster. The title of your video can’t be longer than 300 characters, while the description must be shorter than 4000 characters. You can also use hashtags, insert links, or use time codes so the viewers to increase the interactivity of your videos.
Video Language and Thumbnails
A thumbnail is like a video’s profile picture, and the Microsoft Stream platform creates a few automatically, for each video you upload. You can select one of the thumbnails the platform has generated or you can upload an image from your hard-drive.
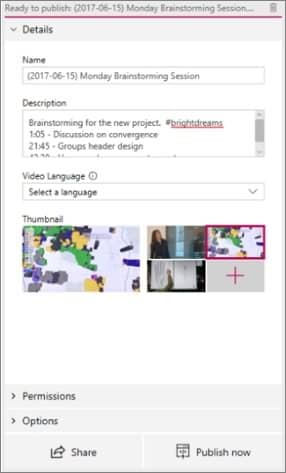
The video language option enables you to select the language spoken in the video. If the language of the video is supported by the portal, the closed caption file will be automatically created which improves the video’s performance in the search results.
Privacy and Permissions
The owner of the video can grant permission to other Stream’s users to view a video. In the Permissions section, you’ll be able to choose the groups or channels where the video will be displayed, or share the video with anyone in your company. Allowing other team members to edit a video, requires you to assign a new owner.
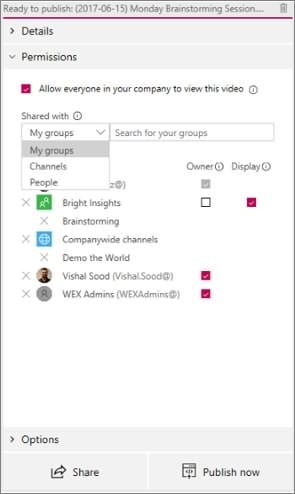
The platform allows you to keep your videos private and available only to users that have a password.
Step 5 - Captions and Subtitle
The Options tab enables you to add captions to a video or upload subtitles. The Video Language feature helps the platform generate captions for all videos automatically, and if you want to upload a subtitle or a caption you’ll need to make sure that they are in the WebVTT file format.
Step 6 - Sharing and Publishing videos
Once you’ve edited the metadata, you can either click on the Publish Now or Share buttons. Clicking on the Publish Now option will start the upload process, and when the video is online it will be shared with everyone you selected.
The Share feature enables you to create a link, by sharing it on an enterprise social network such as Yammer. The link can then be used to share the video on all other social media. If you would like to make further adjustments to the video’s metadata, you can do so by selecting the My Videos option in the My Content menu, and clicking on the Edit option.
How to Manage Videos in Microsoft Stream?
All content you upload to Microsoft Stream will be displayed on My Videos page, and you can edit the metadata, filter, or browse through the videos as well as add videos to channels and groups. The portal enables you to sort out your videos based on different parameters such as view count or publish date, to name a few, which means that you can organize your video collection most functionally.
Editing metadata requires you to go to a group, channel, or My Videos page, click on the More button, and select the Edit option. You can then change the descriptions, hashtags, or any other metadata and improve the video’s search rankings on the platform.
Global administrators and group owners can change the settings of the groups they run. Name, descriptions, or the privacy status can be changed in all groups you manage, and the Delete option is also available if you want to erase a group. In order to do this, you only have to navigate to the group you’re managing and click on the Settings icon.
Summary
Microsoft Stream is still a young platform that facilitates corporate communications through videos. Its features include password protection and amazing sharing options that enable you to distribute a video to an entire company. However, the portal lacks some of the key tools that make communication within an organization easier. Stream’s users can’t capture webcam footage or broadcast live streams, but Microsoft has already announced that many upgrades are in store and that this business-oriented video sharing portal is going to continue to get better.
Max Wales
Max Wales is a writer and a lover of all things video.
Follow @Max Wales
Max Wales
Mar 27, 2024• Proven solutions
The way businesses communicate internally has changed drastically over the last few decades. The Enterprise video market’s current size exceeds $16 billion and it is expected to reach $40 billion by 2022. These numbers show that communication through videos is becoming increasingly popular in business contexts and that their significance for the success of a business is going to continue rising in the foreseeable future.
In April 2015 Microsoft has launched Office 365 Video , a video sharing platform that has been replaced by Microsoft Stream just two years later. Both platforms are a part of Microsoft’s mission to provide organizations of all sizes with a safe place to share their videos. If you would like to find out more about the Microsoft Stream, you’ve come to the right place, because in this guide we are going to provide you with all the information you’ll need to record, upload, and manage videos on Microsoft Stream.
- Part 1: What is Microsoft Stream?
- Part 2: What Can I Do with Microsoft Stream?
- Part 3: How to Use Microsoft Stream?
- Part 4: How to Record Videos in Microsoft Stream?
- Part 5: How to Upload Videos in Microsoft Stream?
- Part 6: How to Manage Videos in Microsoft Stream?
![]()
The All-in-One Screen Recorder & Video Editor
- Record desktop screen, voiceover, and webcam simultaneously
- Edit recorded clips quickly with a wide range of professional tools
- Built-in plentiful templates and effects
- Export to MP4, MOV, MKV, GIF and multiple formats
For Win 7 or later (64-bit)
For macOS 10.12 or later
Secure Download
What is Microsoft Stream?
Microsoft Stream is a corporate web-based YouTube-like platform that enables companies to easily share their videos online and protect their privacy at the same time. You can either use it as a stand-alone web-based application or through the Office 365 Video Enterprise subscription.
Microsoft Stream is designed to help organizations, upload, share, and manage large amounts of video files from one place. However, broadcasting live corporate events, webinars or staff training sessions is not yet possible on Microsoft stream, while the maximum video storage for a single user is limited to 500 GB. Signing up and creating an account is free, but you’ll have to choose a monthly plan to use the platform on an ongoing basis.
What Can I Do with Microsoft Stream?
Setting up an account on Microsoft Stream is a straightforward process that will take just a couple of minutes. After you’ve created an account, you will be able to record, upload and share videos, insert metadata, manage videos, or gain access to advanced video search options.
1. Uploading videos and adding the metadata
Microsoft Stream allows its users to upload video files in bulks or one by one and it offers support for a wide range of video file formats, including some of the most frequently used file types such as MOV, AVI, MP4, or FLV. When you upload a video you can also change its title, select a thumbnail, add hashtags, and edit all other metadata of your videos from within the platform. The portal automatically converts all of the files you upload to Microsoft Stream and optimizes them for viewing on all devices.
2. Managing videos
Users can organize their videos thematically, or in any other way through video channels, like on YouTube, and they can also subscribe to channels so they don’t miss the latest uploads. Creating a watchlist that is displayed on your homepage is also an option Stream provides, so you can make your selection of videos.
3. Sharing videos
Once you’ve uploaded a video to a Microsoft Stream account, you can set its privacy settings to public or private. The platform also enables you to assign videos to multiple channels or groups of viewers of your choosing. Companies can share their videos internally via links, embed codes, or emails that enable the recipients to watch password-protected videos on different platforms.
4. Searching Videos
The metadata improves a video’s searchability as well as its availability to the Stream’s users. Titles, hashtags, and meta descriptions can be used as search terms, but keep in mind that you’ll only be able to view public videos.
How to Use Microsoft Stream?
Before you go ahead and upload your first video to Microsoft Stream, there are just a few more things you should know. The owners of the Office 365 Video account, can access Stream from their accounts, by clicking on the ‘Explore all your apps’ feature and selecting it from the menu. Alternatively, you can create an account on the Microsoft Stream platform, and enjoy the 90 days of the free trial period. Monthly subscriptions for Stream vary between $3 and $5 depending on the pricing plan you’ve selected.
At the moment, there are no Android or iOS apps for Stream, but this doesn’t mean you can’t view videos on this platform from any web browser on any device, including Mac and PCs or Smartphones. You’ll need a 64-bit Windows 7 or later OS if you want to use Microsoft Stream from a PC, while Mac owners must have 64-bit Mac OS 10.11 or later installed on their devices to use this platform.
Here’s how you can record, upload, and manage videos with Microsoft Stream.
How to Record Videos in Microsoft Stream?
Capturing videos with Microsoft Stream requires you to install the inbuilt screen recorder on your computer. You can accomplish this by clicking on the Create menu and selecting the Record a Video option from your account.
Choose the version of the screen recorder that is optimized for the OS you’re using and complete the installation process. This is a one-time procedure and you’ll be able to launch the Stream’s screen recorder from your account for each new session.
Step 1 - Launching the Screen Recorder
To initiate the screencast, you’ll have to repeat the steps you took to install the screen recorder on your computer, so just click on the Create menu, once more and then pick the Record a Video feature from the list.
Step 2 - Adjusting the video settings
Once the screen recorder loads, you’ll be able to select the area of the screen you want to capture, record audio from an external device, and record system audio.
The limited scope of screen recording features also includes the system audio recording option and the feature that enables you to record the movement of your cursor. Don’t start recording before you’ve adjusted all the settings following the demands of the video you’re working on. Hold the Shift + F11 buttons to start recording or click on the big red Record button.
Step 3 - Screencasting with Microsoft Stream
During the screen capturing session, you can mute the video or cancel the process. You can’t capture footage with a webcam with Microsoft’s Stream desktop capturing tool and you can’t draw on screen or use any of the advanced tools for screencasting.
There are no limitations on the duration of your videos, but longer videos are often bigger and they take more time to upload to the platform. You can stop recording by clicking on the Record button.
Step 4 - Post Processing
Immediately after the recording is finished, you’ll be able to preview the video, but Microsoft Stream doesn’t offer even the basic video editing tools. If you want to edit a video, you’ll have to use some other software, and you’ll have to upload a video from your Stream account. Users that don’t want to edit their videos can proceed to upload the content to a group or a channel they are managing.
How to Upload Videos in Microsoft Stream?
The process of uploading videos to this platform may be time-consuming if you are uploading more than just one video, but it is by no means difficult. However, the steps you’ll need to take to upload a video depending on where on the portal you want to upload your video. Here’s how you can upload videos to Microsoft Stream in just a few steps.
Step 1 - Selecting the videos
Head over to the Create menu, and click on the Upload a Video option. This action will enable you to browse the folders on the hard-drive and pick the files you want to upload. Alternatively, you can just drag and drop the video at the specified location on the Stream platform.
Step 2 - Uploading a video to My Videos Page
Click on the My Content menu, that is located next to Create menu, and select the My Videos option. Drag the files you want to upload to the designated area and drop them to start the upload.
You can also search for videos you already uploaded or alter the search criteria. Wait for the videos to be uploaded and then proceed to add a title, metadata, or even subtitles.
Step 3 - Uploading Videos to a Group or a Channel
If you would like to add a video to a Group on the Microsoft Stream portal, simply open the group and drag and drop the file to the designated place.
You can either upload a video from the group’s the Highlights or Videos tab, and the videos will become available in the group after the upload is complete.
Microsoft Stream users who want to add a new video to a channel, just have to navigate to the channel to which they wish to contribute and click on the Select More Files option.
Step 4 - Adding Metadata
This step of the video uploading process is important because if done correctly, it increases the video’s chances to appear high in the search rankings.
Descriptions and Titles
Naming videos and adding a brief description that sums up what goes on in them will help other Stream’s users to find them faster. The title of your video can’t be longer than 300 characters, while the description must be shorter than 4000 characters. You can also use hashtags, insert links, or use time codes so the viewers to increase the interactivity of your videos.
Video Language and Thumbnails
A thumbnail is like a video’s profile picture, and the Microsoft Stream platform creates a few automatically, for each video you upload. You can select one of the thumbnails the platform has generated or you can upload an image from your hard-drive.
The video language option enables you to select the language spoken in the video. If the language of the video is supported by the portal, the closed caption file will be automatically created which improves the video’s performance in the search results.
Privacy and Permissions
The owner of the video can grant permission to other Stream’s users to view a video. In the Permissions section, you’ll be able to choose the groups or channels where the video will be displayed, or share the video with anyone in your company. Allowing other team members to edit a video, requires you to assign a new owner.
The platform allows you to keep your videos private and available only to users that have a password.
Step 5 - Captions and Subtitle
The Options tab enables you to add captions to a video or upload subtitles. The Video Language feature helps the platform generate captions for all videos automatically, and if you want to upload a subtitle or a caption you’ll need to make sure that they are in the WebVTT file format.
Step 6 - Sharing and Publishing videos
Once you’ve edited the metadata, you can either click on the Publish Now or Share buttons. Clicking on the Publish Now option will start the upload process, and when the video is online it will be shared with everyone you selected.
The Share feature enables you to create a link, by sharing it on an enterprise social network such as Yammer. The link can then be used to share the video on all other social media. If you would like to make further adjustments to the video’s metadata, you can do so by selecting the My Videos option in the My Content menu, and clicking on the Edit option.
How to Manage Videos in Microsoft Stream?
All content you upload to Microsoft Stream will be displayed on My Videos page, and you can edit the metadata, filter, or browse through the videos as well as add videos to channels and groups. The portal enables you to sort out your videos based on different parameters such as view count or publish date, to name a few, which means that you can organize your video collection most functionally.
Editing metadata requires you to go to a group, channel, or My Videos page, click on the More button, and select the Edit option. You can then change the descriptions, hashtags, or any other metadata and improve the video’s search rankings on the platform.
Global administrators and group owners can change the settings of the groups they run. Name, descriptions, or the privacy status can be changed in all groups you manage, and the Delete option is also available if you want to erase a group. In order to do this, you only have to navigate to the group you’re managing and click on the Settings icon.
Summary
Microsoft Stream is still a young platform that facilitates corporate communications through videos. Its features include password protection and amazing sharing options that enable you to distribute a video to an entire company. However, the portal lacks some of the key tools that make communication within an organization easier. Stream’s users can’t capture webcam footage or broadcast live streams, but Microsoft has already announced that many upgrades are in store and that this business-oriented video sharing portal is going to continue to get better.
Max Wales
Max Wales is a writer and a lover of all things video.
Follow @Max Wales
Also read:
- "[New] In 2024, Permanent Video Preservation Units"
- "\"[Updated] Essential Tips for Capturing High-Quality Audio in Filmmaking\""
- "[Updated] The Art of Gamers' Screen Recording on Win10 for 2024"
- "\"[Updated] Succeed in Screen Recording Detailed, Orderly Guide\""
- "\"[New] 2024 Approved Logitech’s 4K Webcam Masterclass - A Complete Review\""
- "\"[New] 2024 Approved Guide to Effective Video Capturing via Screencastify\""
- "\"[New] 2024 Approved Record Screen On Huawei Mate 10, 20, P20 and P10 Using a Built-In Recorder\""
- "\"[New] Quintessential 7 First-Person Shooters for 2024\""
- "In 2024, Free2X Webcam Recorder Software Review in Depth"
- "\"[New] 2024 Approved Step-By-Step The Ultimate 4 Methods for Gameplay Screens\""
- "\"[Updated] In 2024, Mastering PPT Recording Essential Tips\""
- "[Updated] In 2024, Enhance Your Media Experience by Learning VLC's Rotation Feature"
- "[New] In 2024, Top Tech Brands in Online Recording Solutions"
- "\"[New] 2024 Approved Apowersoft and Beyond A Critical Look at Recording Software\""
- "\"2024 Approved Insider's Picks Top 15 Android Emulators Compatible with Mac & PC\""
- "\"[New] In 2024, Uncovered Wonders Top 6 Stealthy Audio Capture Tools (Android/iOS)\""
- "\"[Updated] Essential Guide to Premium-Free Phone Video Chat Apps - iOS/Android for 2024\""
- "Tunefab Screen Recorder Download and Review"
- "\"[Updated] 2024 Approved Zoom Calls with Flair Filters Application 101\""
- "\"In 2024, Mac Acoustic Arena Deep Dive\""
- "\"[New] Your Go-To for Epic Virtual Escapades for 2024\""
- "\"[New] 2024 Approved Crucial Steps to Preserve Your Youtube LIVE Video\""
- "7 Essential Audio Tools for Personal Vocal Customization for 2024"
- "\"2024 Approved Lenovo Streamlined Screen Recording Guide\""
- "[Updated] How to Implement Google Meet's Grid View Feature"
- "\"[Updated] Comprehensive List Top Screenshot Videography Tools\""
- "\"[New] 2024 Approved Navigating the World of Instagram Streams with Ease Through OBS\""
- "\"[Updated] 2024 Approved FPS Game Quest – Discovering 7 Ultimate Titles\""
- "\"[Updated] In 2024, Professional Gamers' Guide Optimal Video Capture Tips\""
- "\"[New] In 2024, Cutting-Edge Strategies for Transmitting OBS Livestreams to Facebook\""
- "\"[New] In 2024, Expert Advice Livestream Without the Price Tag\""
- "[New] Streamlining Screen Recording"
- "[New] Reinvent Your Video Storytelling in OBS Studio"
- "Precision Record Keeper for ChromeBook for 2024"
- "\"In 2024, The Ultimate Handbook OBS+Zoom Collaboration\""
- "\"[Updated] In 2024, Uniting Visuals The Art of Video Sequence Composition\""
- "\"[New] Capturing Your Mi 11 Screens - Step by Step for 2024\""
- "\"Game On Compile Your Collection of the Top 12 PC Clickers for 2024\""
- "[Updated] Premium HD Screensnap Tools for 2024"
- "\"[New] 2024 Approved 10 Best Online Video Call (Free to Use)\""
- "[Updated] Best Tools for Live Gameplay Screen Grabs for 2024"
- "TinySnap Capture Assessment with Variants for 2024"
- "[Updated] 10 Innovative Ideas to Shield Your Webcam for 2024"
- "MiniCam Record Evaluation & Backup Software for 2024"
- "\"[New] 2024 Approved Prime Top 10 Free Programs for Screen Visibility\""
- "\"[New] 2024 Approved How-To Manual for Creating an Inclusive and Productive Skype Chat Room Accessible by Both Windows & Mac Users.\""
- "\"[New] 2024 Approved Peak Procurement of Lecture Captures\""
- "\"[New] 2024 Approved VideoPie Interpretation Platform\""
- "Cutting Costs on Cam Recording – A Compreited Analysis & Recommendations"
- New 2024 Approved Deciphering Calm Techniques to Reduce Audio Disturbances From Natural Sources in Digital Recordings
- How to Change Lock Screen Wallpaper on Oppo A38
- 2024 Approved Converting Audacity Audio Productions to MP3 Format
- New 2024 Approved 10 Best Apps to Create Mind-Bending Glitch Art Videos on Mobile
- Top 10 Fingerprint Lock Apps to Lock Your Vivo Y78t Phone
- Top 4 Ways to Trace Xiaomi Redmi A2+ Location | Dr.fone
- How to recover lost data from Vivo ?
- New In 2024, Spotlight on Emerging Emotive Acoustic Selections
- Updated Locating Broken Glass Disturbance Noise
- New 2024 Approved The Ultimate Guide to Adding Background Music in iMovie Videos
- How To Repair iPhone 12 mini System Issues? | Dr.fone
- How To Teleport Your GPS Location On Vivo V29 Pro? | Dr.fone
- In 2024, Unlock Apple iPhone XS Without Passcode Easily | Dr.fone
- Updated In 2024, Detect Clapping Impact Soundscape
- 9 Solutions to Fix Xiaomi Redmi K70 System Crash Issue | Dr.fone
- Title: "In 2024, Real-Time Video Broadcasting Your MS Channel"
- Author: Duchess
- Created at : 2024-05-18 15:19:55
- Updated at : 2024-05-19 15:19:55
- Link: https://screen-video-capture.techidaily.com/in-2024-real-time-video-broadcasting-your-ms-channel/
- License: This work is licensed under CC BY-NC-SA 4.0.
