
!["[New] Mastering Mac Webcam Video Recording Top 5 Simple Methods for 2024"](https://www.lifewire.com/thmb/QlJ49L63E9oyywyXJAGv3C_qUuE=/400x300/filters:no_upscale():max_bytes(150000):strip_icc():format(webp)/switcheshero-4f3b792cb7014baf919e7c68b91e96ab.jpg)
"[New] Mastering Mac Webcam Video Recording Top 5 Simple Methods for 2024"
Mastering Mac Webcam Video Recording: Top 5 Simple Methods
Visual communication is more impactful than text and voice recording. That is why online users prefer watching videos to listening to podcasts and reading articles on websites. In the current world of digital communication, people record their videos with a webcam and upload them on social media sites and video streaming platforms. Corporates also record video messages and share them with team members and colleagues.
If you want to record video from your Mac, the easiest approach is to record video with webcam on Mac. You have to option to record a video with your face only or record the screen and your face together in Picture-in-Picture mode. You will need a screen and video recorder to effectively use the MacBook webcam video recording feature. In this article, we will illustrate all the best ways of recording video with a webcam on a Mac.
Way 1. Use QuickTime Player to Record Mac Webcam
Way 2. Most Effective Way to Record Mac Webcam: Use Filmora
Way 3. Quick Mac Webcam Recording with Photo Booth
Way 4. Default Mac Webcam recording With iMovie
Way 5. How to Record Mac Webcam Online
Tips. For Recording Videos on a Mac Webcam
Way 1 Use QuickTime Player to Record Mac Webcam
QuickTime Player is the default media player on Mac. The application comes pre-installed. However, not many Mac users are aware of the recording features of QuickTime Player. You can record your screen activities as well as record video through your webcam for free.
While using the QuickTime Player screen recording, you can easily record yourself or others on your Mac screen. Here are the steps to follow to record video on Mac webcam with QuickTime Player.
Step 1: Launch QuickTime Player on your Mac
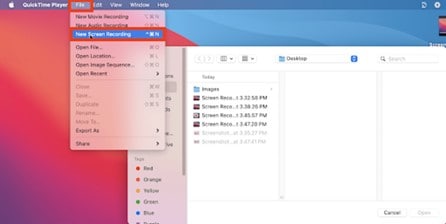
Open QuickTime Player from the Applications folder. Simply go to the File Option to the top left corner of the screen, and click New Screen Recording.
Step 2: Set QuickTime to Start Recording
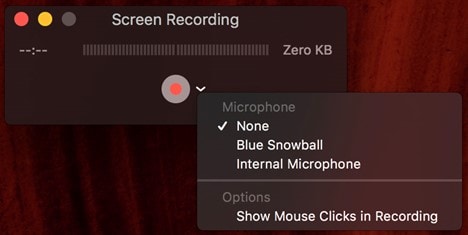
Once QuickTime opens, go to File > New Movie Recording option. This will allow you to customize your recording options to achieve your specific goals. Set the preferences for the cursor, microphone, timer, and saving location.
Step 3: Start Recording with QuickTime Player
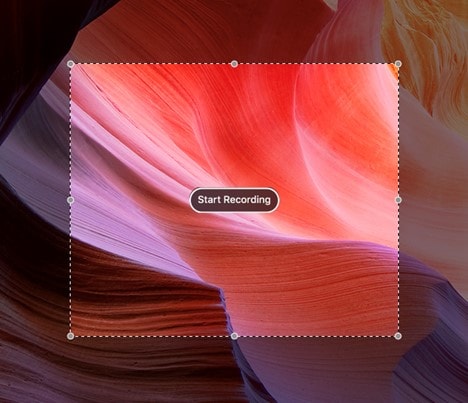
On the screen, you will see yourself through the webcam. Once you are ready, click on the Record button on the floating bar. Be sure to pick your preferred option, whether you want to record the enter screen or just the selected portion.
Step 4: Save you Recording
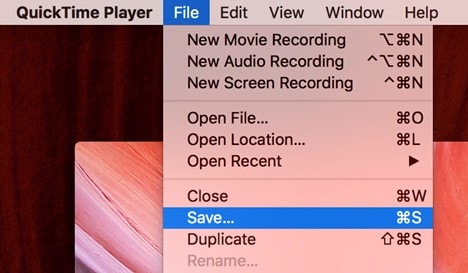
When you are done recording, click on the top button/icon. Then, go to File > Save to save the recorded video.
By following these simple steps, QuickTime Player allows you to record videos on your MacBook. You can then save the recorded video on your desktop for further enhancements. You can trim it if need be using the same tool as well.
Even though QuickTime Player is the easiest way of recording video on Mac webcam, it is not the best way. This is because there are limited settings available and there are several glitches reported such as audio not getting recorded.
Way 2 Most Effective Way to Record Mac Webcam: Use Filmora
The best webcam recorder Mac is Wondershare Filmora. It is a professional and premium screen and video recorder as well as video editor. Therefore, you can not only record your webcam video with audio but also edit out the video as per your requirements. In fact, you can record your screen as well as the webcam with audio from microphone simultaneously. That is why professional video creators use Filmora to publish high-quality video after proper editing. Here are the steps to follow for screen recording with webcam Mac using Filmora.
For Win 7 or later (64-bit)
For macOS 10.12 or later
How to Access Video Recording Option on Filmora
To record videos on your Mac using Filmora, you need to access the Screen Recorder feature. This allows you to record videos on the screen of your Mac with ease. Let’s have a look at the option for video recording available on Filmora and the steps to follow:
Method 1 Using the Main Menu
Click on the “Screen Recorder” tab from the options given on Filmora’s main screen. This will launch the screen recorder window for the next step.
Method 2 Using the Top Toolbar
Navigate towards the “Files” tab from the main interface of Filmora. Click on it and choose the “Record Media” option from the dropdown menu. Then select the recorder you want to use.

Method 3 Using the Search Bar Menu
Navigate towards the search bar in the main window of Filmora, just below the custom toolbar. Expand the “Record” option on its left and select the recording option you want to use from the dropdown menu.
How to Record Videos on Mac With Filmora: Step-by-Step Guide
Filmora offers an easy and quick way to record videos on your Mac. The Screen Recording features can be great for various types of videos including tutorials and demonstrations. Here are the key steps to follow when recording videos on a Mac using Filmora.
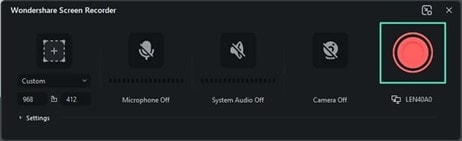
Step 1: Set the Screen Resolution for Recording
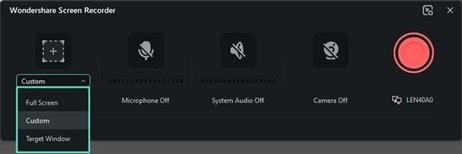
Once you have selected and started the screen recorder feature, specify the screen resolution needed from the options under the “Square” icon. The three options available include recording “Full Screen”, “Custom”, or “Target Window”. You also have the option to manually adjust the Length” and “Width” values of the screen or use the ratio box on the screen.
Step 2: Select the Type of Recording
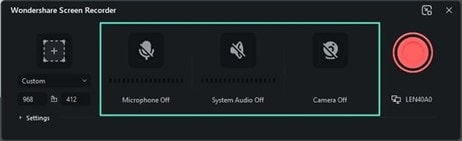
In Filmora, three recording options are displayed on the screen recorder window. They can use the “Microphone” to capture voice during a recording session. In addition, users can experiment with the “System Audio” or “Camera” options. The best part is they have the choice to enable or disable all three options.
Step 3: Customize Settings For Recording
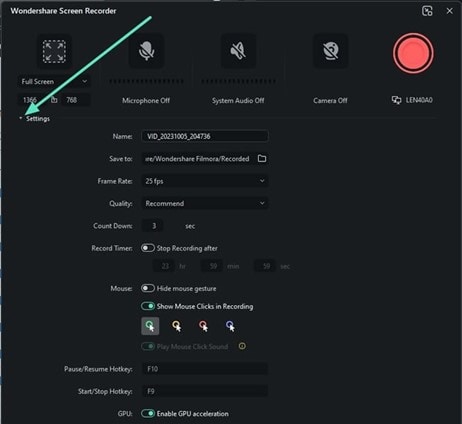
Expand the “Settings” option at the bottom left corner of the recording window. Filmora also allows you to customize additional settings as needed.
Step 4: Start Recording
To start recording your video on a Mac with Filmora, press the red recorder button. A countdown will appear indicating that Filmora is about to start recording the video. However, you can skip this by pressing the “Start Directly” button below the countdown. Once the recording process has started, you will have the options to “Pause”, “Stop”, and start “Re-record”.

Way 3 Quick Mac Webcam Recording with Photo Booth
Photo Booth is another pre-installed application on Mac which is specifically designed to capture photos and videos through webcam. You can create profile pictures, take selfies, and shoot videos with your face through webcam. It becomes easy to shoot anything and share the recording across instantly. Here are the steps to record webcam Mac with Photo Booth.
Filmora offers an easy and quick way to record videos on your Mac. The Screen Recording features can be great for various types of videos including tutorials and demonstrations. Here are the key steps to follow when recording videos on a Mac using Filmora.
Step 1: Launch Photo Booth App
Go to the Applications folder and open the Photo Booth app.

Step 2: Choose Video Mode
Once the Photo Booth opens, you must see yourself live through a webcam. Click on the “Record A Movie Clip” icon. Make sure you have clicked the Video icon at the bottom-left corner to switch to video mode.

Step 3: Record and Save Your Video
Once you are ready, click on the Record button. The video recording on your Mac will start and you can select the Stop open when done. If you want to share the video instantly, click on the thumbnail in the bottom-right corner to open the recorded video.
The process of recording videos on a Mac with Photo Booth app is as simple as that. The app also lets you export the recorded video and save it on your Mac. Although the process is simplified, the app is lacks impact features compared to other video recording options for Mac.
Way 4 Default Mac Webcam recording With iMovie
iMovie is a great application designed specifically to record video and turn them into a movie. You can capture 4K videos with your webcam depending on the quality of the camera. There are various settings available to ensure that the recording is top-notch to fulfill all your requirements. If iMovie is not pre-installed on Mac, you can download it from App Store. Here are the steps to record video on Mac webcam using iMovie.
Step 1: Launch iMovie
The first thing you need to do is to install iMovie if you don’t have it in your Mac. Head to the Mac App Store, and search for an install iMovie on your Mac. Then go to File, and select New Movie to start recording using the application.
Step 2: Find the Import Button
On the next screen that appears, click on the Import icon (downward arrow) at the top of the window.
Step 3: Select Cameras
Go to the Cameras section on the left side. Then, select your connected webcam by clicking FaceTime HD Camera. iMovie also allows you to select the project from the top of the screen and import the video.
Step 4: Start Recording Your Video
Click on the Record button present at the bottom of the application window to start recording. Once you are done recording, click Stop.

Step 5: Save Your Video
To stop recording, click on the Close button at the bottom of the Mac screen. Go to Projects menu option and save the recorded file.

Way 5 How to Record Mac Webcam Online
Using a native webcam recorder on Mac such as QuickTime Player and iMovie makes it easy to record a video. However, using online options gives you access to a tool that is not limited to Mac only. For instance, the AppGeeker Screen Recorder works great in recording a webcam on Mac from an internal or external camera. You only need to make sure all the features of your Mac webcam are working. Here is a brief step-by-step guide for recording Mac webcams online.
Step 1: Launch the Online Program
Launch the program and select Webcam Recorder on your Mac. You have the option to select Video Recorder to record a Mac webcam and screen in one frame.
Step 2: Turn on the Camera and Microphone options
Check if everything is okay in the live webcam window. For multiple cameras, it is a good idea to switch to another from the webcam selector.
Step 3: Record and Save Your Video
When ready to start, hit the REC button. Once done, click the same button to stop recording. You can now use the Play button to preview the recorded webcam video and save it to your Mac.
Tips For Recording Videos on a Mac Webcam
Creating a good MacBook webcam recording takes a bit of effort. Although with the right app or software, you can record a good video, making a few adjustments can lead to even better outcomes. Here are a few tips to improve the quality of your video recording with a Mac webcam.
- Finding a good spot: Your video recording can make a huge difference when it comes to creating a video. This is particularly important to ensure that the sound and look on video is good. Look for a location with minimal background noise and without echoes to make e sure your voice sounds clear. Also, make sure your background is not distracting background and allows your audience to focus on the subject.
- Setting your camera: make sure to set the camera at the eye level. In doing so, your viewers will have a natural feeling while watching the video. This level creates a realistic feeling like you are talking to them in person.
- Framing: With good framing, you can properly present yourself to the audience. By being at the center of the frame, the top of your head and mid-chest will be easily visible. This also helps to ensure that you leave some space above the head to avoid the frame feeling cluttered.
- Lighting: When recording indoors, find a room that has plenty of natural light but avoid direct sunlight when recording outdoors. In situations where you are using additional light sources, make sure they are in front of you and your face is evenly lit.
Conclusion
Hopefully, you have understood how to record video with webcam on Mac for free using QuickTime Player and Photo Booth. iMovie is another great app for Mac users to record webcam. But for the professional-quality recording through webcam, Filmora for Mac should be your first preference. You can do screen recording with webcam Mac with Filmora to publish them on various online platforms.
Way 2. Most Effective Way to Record Mac Webcam: Use Filmora
Way 3. Quick Mac Webcam Recording with Photo Booth
Way 4. Default Mac Webcam recording With iMovie
Way 5. How to Record Mac Webcam Online
Tips. For Recording Videos on a Mac Webcam
Way 1 Use QuickTime Player to Record Mac Webcam
QuickTime Player is the default media player on Mac. The application comes pre-installed. However, not many Mac users are aware of the recording features of QuickTime Player. You can record your screen activities as well as record video through your webcam for free.
While using the QuickTime Player screen recording, you can easily record yourself or others on your Mac screen. Here are the steps to follow to record video on Mac webcam with QuickTime Player.
Step 1: Launch QuickTime Player on your Mac
Open QuickTime Player from the Applications folder. Simply go to the File Option to the top left corner of the screen, and click New Screen Recording.
Step 2: Set QuickTime to Start Recording
Once QuickTime opens, go to File > New Movie Recording option. This will allow you to customize your recording options to achieve your specific goals. Set the preferences for the cursor, microphone, timer, and saving location.
Step 3: Start Recording with QuickTime Player
On the screen, you will see yourself through the webcam. Once you are ready, click on the Record button on the floating bar. Be sure to pick your preferred option, whether you want to record the enter screen or just the selected portion.
Step 4: Save you Recording
When you are done recording, click on the top button/icon. Then, go to File > Save to save the recorded video.
By following these simple steps, QuickTime Player allows you to record videos on your MacBook. You can then save the recorded video on your desktop for further enhancements. You can trim it if need be using the same tool as well.
Even though QuickTime Player is the easiest way of recording video on Mac webcam, it is not the best way. This is because there are limited settings available and there are several glitches reported such as audio not getting recorded.
Way 2 Most Effective Way to Record Mac Webcam: Use Filmora
The best webcam recorder Mac is Wondershare Filmora. It is a professional and premium screen and video recorder as well as video editor. Therefore, you can not only record your webcam video with audio but also edit out the video as per your requirements. In fact, you can record your screen as well as the webcam with audio from microphone simultaneously. That is why professional video creators use Filmora to publish high-quality video after proper editing. Here are the steps to follow for screen recording with webcam Mac using Filmora.
For Win 7 or later (64-bit)
For macOS 10.12 or later
How to Access Video Recording Option on Filmora
To record videos on your Mac using Filmora, you need to access the Screen Recorder feature. This allows you to record videos on the screen of your Mac with ease. Let’s have a look at the option for video recording available on Filmora and the steps to follow:
Method 1 Using the Main Menu
Click on the “Screen Recorder” tab from the options given on Filmora’s main screen. This will launch the screen recorder window for the next step.
Method 2 Using the Top Toolbar
Navigate towards the “Files” tab from the main interface of Filmora. Click on it and choose the “Record Media” option from the dropdown menu. Then select the recorder you want to use.
Method 3 Using the Search Bar Menu
Navigate towards the search bar in the main window of Filmora, just below the custom toolbar. Expand the “Record” option on its left and select the recording option you want to use from the dropdown menu.
How to Record Videos on Mac With Filmora: Step-by-Step Guide
Filmora offers an easy and quick way to record videos on your Mac. The Screen Recording features can be great for various types of videos including tutorials and demonstrations. Here are the key steps to follow when recording videos on a Mac using Filmora.
Step 1: Set the Screen Resolution for Recording
Once you have selected and started the screen recorder feature, specify the screen resolution needed from the options under the “Square” icon. The three options available include recording “Full Screen”, “Custom”, or “Target Window”. You also have the option to manually adjust the Length” and “Width” values of the screen or use the ratio box on the screen.
Step 2: Select the Type of Recording
In Filmora, three recording options are displayed on the screen recorder window. They can use the “Microphone” to capture voice during a recording session. In addition, users can experiment with the “System Audio” or “Camera” options. The best part is they have the choice to enable or disable all three options.
Step 3: Customize Settings For Recording
Expand the “Settings” option at the bottom left corner of the recording window. Filmora also allows you to customize additional settings as needed.
Step 4: Start Recording
To start recording your video on a Mac with Filmora, press the red recorder button. A countdown will appear indicating that Filmora is about to start recording the video. However, you can skip this by pressing the “Start Directly” button below the countdown. Once the recording process has started, you will have the options to “Pause”, “Stop”, and start “Re-record”.
Way 3 Quick Mac Webcam Recording with Photo Booth
Photo Booth is another pre-installed application on Mac which is specifically designed to capture photos and videos through webcam. You can create profile pictures, take selfies, and shoot videos with your face through webcam. It becomes easy to shoot anything and share the recording across instantly. Here are the steps to record webcam Mac with Photo Booth.
Filmora offers an easy and quick way to record videos on your Mac. The Screen Recording features can be great for various types of videos including tutorials and demonstrations. Here are the key steps to follow when recording videos on a Mac using Filmora.
Step 1: Launch Photo Booth App
Go to the Applications folder and open the Photo Booth app.
Step 2: Choose Video Mode
Once the Photo Booth opens, you must see yourself live through a webcam. Click on the “Record A Movie Clip” icon. Make sure you have clicked the Video icon at the bottom-left corner to switch to video mode.
Step 3: Record and Save Your Video
Once you are ready, click on the Record button. The video recording on your Mac will start and you can select the Stop open when done. If you want to share the video instantly, click on the thumbnail in the bottom-right corner to open the recorded video.
The process of recording videos on a Mac with Photo Booth app is as simple as that. The app also lets you export the recorded video and save it on your Mac. Although the process is simplified, the app is lacks impact features compared to other video recording options for Mac.
Way 4 Default Mac Webcam recording With iMovie
iMovie is a great application designed specifically to record video and turn them into a movie. You can capture 4K videos with your webcam depending on the quality of the camera. There are various settings available to ensure that the recording is top-notch to fulfill all your requirements. If iMovie is not pre-installed on Mac, you can download it from App Store. Here are the steps to record video on Mac webcam using iMovie.
Step 1: Launch iMovie
The first thing you need to do is to install iMovie if you don’t have it in your Mac. Head to the Mac App Store, and search for an install iMovie on your Mac. Then go to File, and select New Movie to start recording using the application.
Step 2: Find the Import Button
On the next screen that appears, click on the Import icon (downward arrow) at the top of the window.
Step 3: Select Cameras
Go to the Cameras section on the left side. Then, select your connected webcam by clicking FaceTime HD Camera. iMovie also allows you to select the project from the top of the screen and import the video.
Step 4: Start Recording Your Video
Click on the Record button present at the bottom of the application window to start recording. Once you are done recording, click Stop.
Step 5: Save Your Video
To stop recording, click on the Close button at the bottom of the Mac screen. Go to Projects menu option and save the recorded file.
Way 5 How to Record Mac Webcam Online
Using a native webcam recorder on Mac such as QuickTime Player and iMovie makes it easy to record a video. However, using online options gives you access to a tool that is not limited to Mac only. For instance, the AppGeeker Screen Recorder works great in recording a webcam on Mac from an internal or external camera. You only need to make sure all the features of your Mac webcam are working. Here is a brief step-by-step guide for recording Mac webcams online.
Step 1: Launch the Online Program
Launch the program and select Webcam Recorder on your Mac. You have the option to select Video Recorder to record a Mac webcam and screen in one frame.
Step 2: Turn on the Camera and Microphone options
Check if everything is okay in the live webcam window. For multiple cameras, it is a good idea to switch to another from the webcam selector.
Step 3: Record and Save Your Video
When ready to start, hit the REC button. Once done, click the same button to stop recording. You can now use the Play button to preview the recorded webcam video and save it to your Mac.
Tips For Recording Videos on a Mac Webcam
Creating a good MacBook webcam recording takes a bit of effort. Although with the right app or software, you can record a good video, making a few adjustments can lead to even better outcomes. Here are a few tips to improve the quality of your video recording with a Mac webcam.
- Finding a good spot: Your video recording can make a huge difference when it comes to creating a video. This is particularly important to ensure that the sound and look on video is good. Look for a location with minimal background noise and without echoes to make e sure your voice sounds clear. Also, make sure your background is not distracting background and allows your audience to focus on the subject.
- Setting your camera: make sure to set the camera at the eye level. In doing so, your viewers will have a natural feeling while watching the video. This level creates a realistic feeling like you are talking to them in person.
- Framing: With good framing, you can properly present yourself to the audience. By being at the center of the frame, the top of your head and mid-chest will be easily visible. This also helps to ensure that you leave some space above the head to avoid the frame feeling cluttered.
- Lighting: When recording indoors, find a room that has plenty of natural light but avoid direct sunlight when recording outdoors. In situations where you are using additional light sources, make sure they are in front of you and your face is evenly lit.
Conclusion
Hopefully, you have understood how to record video with webcam on Mac for free using QuickTime Player and Photo Booth. iMovie is another great app for Mac users to record webcam. But for the professional-quality recording through webcam, Filmora for Mac should be your first preference. You can do screen recording with webcam Mac with Filmora to publish them on various online platforms.
Also read:
- "[Updated] Streamline Techniques for Live Sports Video Archiving"
- "\"[New] 2024 Approved Innovative Ways to Record and Preserve Streaming Sounds Online\""
- "[Updated] Best Tools for Live Gameplay Screen Grabs for 2024"
- "\"[Updated] Seamless Broadcasting Gamers' Secrets From OBS\""
- "\"[New] Strategy Stories The Leading 10 Rogue Classics\""
- "[New] Ideal Image Logger for Windows 11 Users for 2024"
- "\"Transforming Team Meeting Aesthetics The Pre/Post Customization Angle\""
- "\"Live TV on Your Desktop Windows PC Masterclass in Capturing Screens for 2024\""
- "\"Master OBS on macOS Download, Setup & Get to Work for 2024\""
- "Top 10 Games Like Ghost of Tsushima You Must Try"
- "RealTime Recording Titans for 2024"
- "\"[Updated] Unlocking Viewership Growth on Twitch Top 4 Strategies\""
- "\"[Updated] Mobile Security-Focused The Leading 10 Free Video Calling Applications for 2024\""
- "[New] Jolly Gaming Haven for Little Explorers for 2024"
- "\"[New] In 2024, The Ultimate Guide to Best-in-Class Racing Games\""
- "\"[Updated] 2024 Approved Eternal Clip Saver Software\""
- "\"[New] The Finest Lineup Top 7 Aim-Focused Titles for 2024\""
- "\"[Updated] 2024 Approved Simplified Steps for Capturing Google Voice Calls\""
- "[Updated] Spearheading Efficient Speech Recognition on Google Platforms"
- "[New] In 2024, Top 10 ScreenRecord Tips and Tricks on a Laptop"
- "\"[New] 2024 Approved Effortless Android Screenshot & Screen Record\""
- "\"In 2024, How to Excel at PPT Delivery Google Meet Tactics for Any Device\""
- "[New] Essential Simple Shelter Strategies in MC for 2024"
- "\"In 2024, Creating a Seamless Virtual Workspace Slack-Filmora Combo for Teams\""
- "\"Ultimate Guide 5 Advanced Webcams for Video Calls for 2024\""
- "\"Efficient Recording Capture Your Dell Display Swiftly for 2024\""
- "In 2024, Quintessential 6 Realistic Mojave Homes"
- "\"[Updated] 2024 Approved Android's Free Video Chat Alternatives Top List\""
- "\"[New] 2024 Approved High-Quality Video Calling Solutions Top 10 Best Apps Ranked!\""
- "\"[Updated] 2024 Approved Strategies to Eliminate Frames Loss in OBS Recordings\""
- "\"[Updated] In 2024, In-Depth Review ScreenFlow Full Package for Mac\""
- "\"[Updated] In 2024, Easy Recording Guide PowerPoints & Webcams Unite\""
- "Win11's Ultimate Video Recorder Guide"
- "\"[New] Pros & Cons of VSDC The Ultimate Guide\""
- "[New] A Guide to the Top 12 Most Captivating PC Clickers for 2024"
- "\"[Updated] 2024 Approved Savvy Screenshot Tactics for Netflix on Mac - A Complete Guide of Six Ways\""
- "[New] Critical Insight Into Recmeister's Video Capture Efficacy"
- "[New] Premier iOS Devices to Play PSP Games in High Fidelity, 2023 Edition"
- "\"[New] Pixels and Players Advanced Tactics for Recording Gaming\""
- "\"[Updated] Game On & Store More Top 5 SSD Reviews for Xbox\""
- "\"[Updated] Virtual City Escapades - A List of Flavorful Pals to GTA V\""
- New 2024 Approved Getting Started with HD Video Understanding Pixel Size and Resolution
- How to Unlock Infinix Note 30 VIP Racing Edition Phone with Broken Screen
- In 2024, Effortless Ways to Transfer Data from Your Apple iPhone 11 Pro Max to iPhone 15 | Dr.fone
- Updated Frequency Finder The Leading Linux Audio Software Options, Free or Full-Price, for 2024
- 8 Quick Fixes Unfortunately, Snapchat has Stopped on Poco C55 | Dr.fone
- FRP Hijacker by Hagard Download and Bypass your Honor Magic5 Ultimate FRP Locks
- Huawei won’t play HEVC H.265 media, how to fix?
- New In 2024, Master Your Tunes The Best iPhone & Android Applications for Music Arrangement
- In 2024, Top 4 SIM Location Trackers To Easily Find Your Lost Oppo A38 Device
- Updated 10 Best Free Online Video Compressors No Download for 2024
- Unlock Your Disabled Apple iPhone 14 Pro Without iTunes in 5 Ways | Dr.fone
- Stuck at Android System Recovery Of Vivo V30 Lite 5G ? Fix It Easily | Dr.fone
- New Follow the Steps We Are About to Outline and You Will Have No Issues with Your 3GP Video Cutting Experience for 2024
- In 2024, Remove the Lock Screen Fingerprint Of Your Xiaomi Redmi Note 12T Pro
- How to Downgrade Apple iPhone 13 Pro without Losing Data? | Dr.fone
- Easy Steps on How To Create a New Apple ID Account On iPhone 8 | Dr.fone
- In 2024, How to Fix Apple iPhone XS Max Passcode not Working?
- Updated 2024 Approved Sometimes You May Come Across Avidemux No Sound Issue After Exporting the Project. Want to Find a Solution? Just Read on This Article
- Updated 2024 Approved FCPX Freezing or Crashing? Try These Quick Fixes
- Whats Hot on the App Store Top iPhone Apps , Ranked
- 10 Best Fake GPS Location Spoofers for Samsung Galaxy M14 4G | Dr.fone
- Xiaomi Redmi Note 12T Pro Not Receiving Texts? 10 Hassle-Free Solutions Here | Dr.fone
- Updated 2024 Approved Harmonizing Screens A List of the Top 15 Scores for Various Genre Videos
- In 2024, How and Where to Find a Shiny Stone Pokémon For Honor Magic V2? | Dr.fone
- New In 2024, MP3 Conversion Made Easy The Best Mac Software Solutions
- How to Fix the Soft Bricked OnePlus 12? | Dr.fone
- Reasons for Xiaomi Redmi K70 Stuck on Startup Screen and Ways To Fix Them | Dr.fone
- Latest Guide How To Bypass Tecno Pova 5 FRP Without Computer
- In 2024, 3 Ways to Unlock Apple iPhone SE without Passcode or Face ID
- MOV playback issues on Samsung Galaxy A15 5G
- 5 Ways to Restart OnePlus 11 5G Without Power Button | Dr.fone
- Free Ways To Split Video For Whatsapp Status On All Platforms
- New 2024 Approved Harmonizing Hertz Techniques for Consistent Audio Levels Across Video Media
- In 2024, How does the stardust trade cost In pokemon go On Samsung Galaxy A05s? | Dr.fone
- Fixing Foneazy MockGo Not Working On Samsung Galaxy A15 4G | Dr.fone
- New In 2024, Fast Forward Best GIF Speed Editors for Any Device
- How To Unlock iPhone 14 Pro Without Swiping Up? 6 Ways
- New Free and Fantastic 10 Ubuntu Video Editing Software Options for 2024
- In 2024, A Guide Nokia 150 (2023) Wireless and Wired Screen Mirroring | Dr.fone
- How to Recover lost Calendar on iPhone 14 Pro Max | Stellar
- Title: "[New] Mastering Mac Webcam Video Recording Top 5 Simple Methods for 2024"
- Author: Duchess
- Created at : 2024-05-18 15:26:36
- Updated at : 2024-05-19 15:26:36
- Link: https://screen-video-capture.techidaily.com/new-mastering-mac-webcam-video-recording-top-5-simple-methods-for-2024/
- License: This work is licensed under CC BY-NC-SA 4.0.
