![[New] The Essential Lenovo Display Recording Hacks](https://thmb.techidaily.com/d3a69700e0cb55adae67e72e210fb2f2a9d54f1a94f5e0b261b4ccf5f3207b46.jpg)
[New] The Essential Lenovo Display Recording Hacks
The Essential Lenovo Display Recording Hacks
Lenovo laptops are very popular, with about one out of every 10 individuals owning one. Perhaps you wish to record an online course for later study or create an instructive video lesson for others while using the Lenovo PC. A good Lenovo laptop screen recorder is required at that moment. When you want to capture and store a live streaming clip, instructive session, or webinar that you want to share, the best Lenovo Laptop Screen Recorders come in helpful.
Recording the screen of your Lenovo tablet in a video with sound and saving it as a video file, then sending it or uploading it to a platform like YouTube or social networks, maybe extremely beneficial for performing a lesson or showing an acquaintance how to complete specific operations in a Lenovo. We sometimes want to film a tale that we saw on Instagram of an acquaintance, a phone conversation, or a video chat with a family member to save as a memento, to use as proof, or to use as a lesson video.
Way 1. Use Windows Game Bar
Way 2. Record Lenovo with Filmora
Way 3. Use ShareX to Record Lenovo
Way 4. Record Lenovo with Screencast-O-Matic
Way 1. Use Windows Game Bar
This software enables you to record a portion of your screen or the whole screen depending on your requirements, and the recording process may be completed in three easy steps. When you need to capture screenshots, it may also be utilized as a snapshot tool. Gamebar is a simple screen recording app for Lenovo Windows laptops that includes several features for creating high-quality footage.
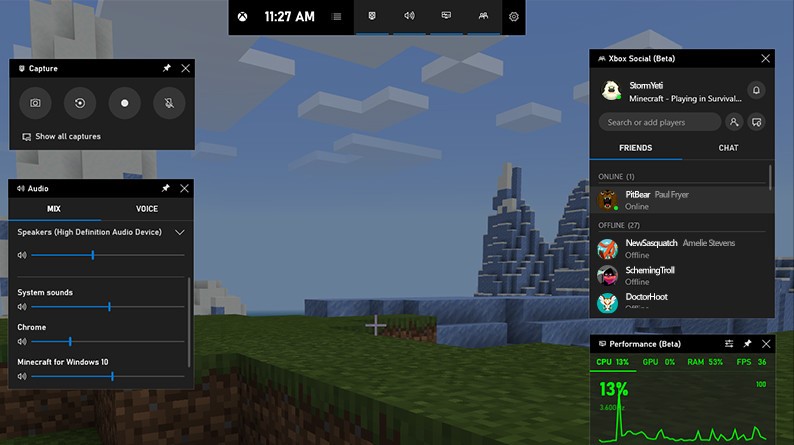
Step 1: Press Win + G to open the Xbox Game Bar after clicking the Start button. The Xbox Game Bar appears at the top-focus border of your screen.
Step 2: On the left, choose Captures captured to examine and edit further customization options if required. There are also options to enable recording while projecting your screen, to define the maximum account duration, and to alter your sound and video quality settings.
Step 3: On the Capture overlay, click the circular Start Recording button to begin. Click the purple Stop button to cancel the account.
Step 4: All of the movies you’ve shot are stored as MP4 files in the following directory on your Lenovo laptop: Videos >> File Explorer >> This PC
Way 2. Record Lenovo with Filmora
With a wide variety of capabilities, Filmora is undoubtedly one of the finest Lenovo laptop screen recorder programs on the market right now. It may be used to record displays and capture many types of screenshots. The handy screen recorder is small and light, with a simple dashboard that neatly organizes all of the tools. Wondershare’s Filmora is a strong laptop screen recording program with a robust video editing toolbox for professional output. It can simultaneously record voiceover, display, and webcam. Not only that, but it also enables you to improve your videos after they’ve been captured by adding distinctive transitions and green screen effects.
Filmora Screen Recorder
Record computer screen and webcam
Capture system and microphone audio
Customize the target recording area
Edit videos with thousands of effects and tools
Step 1: Get Filmora and install it on your Lenovo laptop.
To begin, you must first download this software program to your Lenovo system from the following links:
After the download is complete, you must now install it on your Lenovo system to begin using it with the optimum compatibility with your laptop.
Step 2: Launch the Program and Begin Customizing It

The next step is to open the software program so that you can begin recording the Lenovo screen without difficulty. To begin, just go to the New Recording button in the start-up window, which will launch the recorder. With the incorporated tools in Filmora, you can completely modify your Lenovo screen recordings. You may also choose the audio source you want to use, such as a microphone, system sound from both, or your Lenovo laptop’s Webcam, to include in your recordings.
Step 3: Start/Stop Lenovo Screen Recording
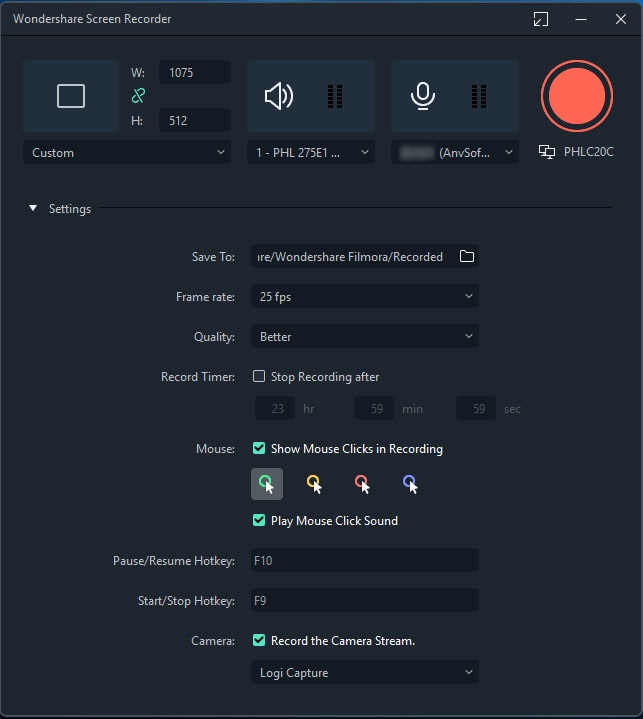
Now is the time to start the recording, which you can do by pressing the red circular recording button, which will start the recording of your audio. Similarly, to stop the recording, press the Square-shaped button on your Lenovo laptop’s screen.
Step 4: Edit the Recordings and Save Them
For Win 7 or later (64-bit)
For macOS 10.12 or later
Finally, you may use completely customizable editing tools to alter your audio recordings. To do so, use Filmora’s editor and modify your recorded audio files using simple to advanced editing methods.
Way 3. Use ShareX to Record Lenovo
In terms of screen capture, ShareX is likewise open-source. You may use this free video recording program to record any action on your Lenovo computer’s screen. Using this lightweight screen capture program, there are no problems when it comes to capturing the screen. It not only allows you to record your screen, but it also allows you to manage your images and screenshots. You may select whether or not to include the cursor in the photo, set a timeframe, and even utilize the OCR tool to detect the text on your image while working with it. Because of its extensive screen-capture capabilities, the open-source program is popular among gamers. The “scrolling screenshot” option you’re searching for is among those capabilities, which include video capture, GIFs, region-select, and workflows, as well as a wide variety of filters and effects to add to your captures.
Step 1: Go to https://getsharex.com/ and download and launch the ShareX executable file.
Step 2: The nicest thing is that it can also record audio. Select your microphone as the audio source in Task Settings -> Screen Recorder under Capture -> Screen Recording Options.
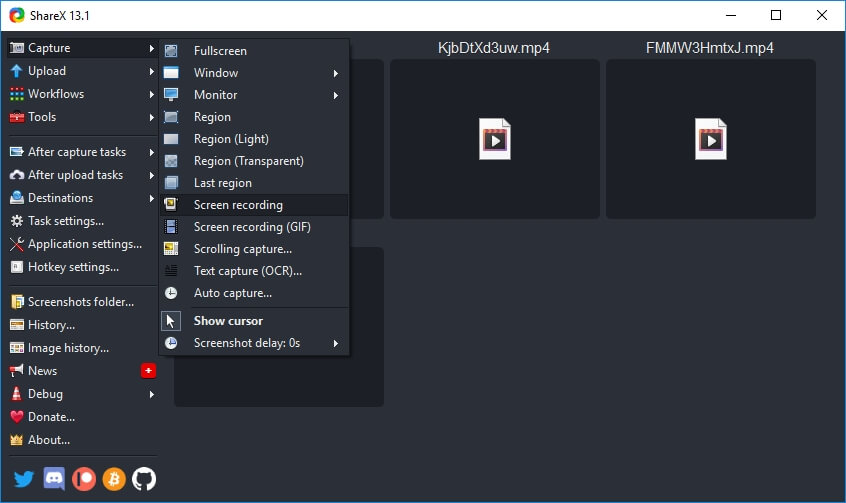
Step 3: Fullscreen capture, capture a specific window or part of the screen, screen recording to video or Gif, and auto-capture are all possibilities under the Capture menu.
Step 4: When you record anything, it will be saved in the Screenshots folder on the left side menu. You may use this function to choose a file from your device and instantly upload it into the software for editing. A simple drag and drop motion may also be used to accomplish this.
Way 4. Record Lenovo with Screencast-O-Matic
You may use Screencast-O-Matic to record (‘screencast’) your computer’s screen. Every action you do will be documented. This recording is a video or audio recording that just contains your remarks. Screencast-O-Matic is a free screen capturing tool available online. This program captures a portion of your screen, as well as audio and camera input. This application may be used to capture narrated lectures or demos and turn them into videos for your courses. It is widely regarded as one of the most efficient screen recording apps for creating YouTube presentations and lessons.
Step 1. To install the Screencast Recorder on your PC, go to the following link:
https://screencast-o-matic.com/download

Step 2. To finish the installation, download and run the setup installer. Launch the Recorder from the Start Menu in Windows or the Application folder on a Mac machine when the installation is complete.
Step 3: You’ll notice a variety of modification choices inside the recorder to personalize your movie to your preferences. Free recording time is restricted to 15 minutes for each video; upgrade to a Deluxe or Premier subscription to get unlimited recording time. Both the free and commercial versions of the screen recorder allow you to record an unlimited number of videos.
Step 4: Save the file as an mp4, AVI, or FLV. Then, on your device, choose a target folder. Click “publish” after giving your video a name so you can locate it later.
Conclusion
The easiest method for screen capture on Lenovo is to utilize the key combination, however, there are limited customization options and commenting equipment. With the built-in basic tools, you may easily capture the perfect photo, sound document, or screen movie on the Windows screen. You may read about the best screen recorders for Lenovo laptops and choose one to begin recording. Filmora, which can cover practically all of your screen recording needs, is highly recommended for individuals who seek something simple and strong.
Way 2. Record Lenovo with Filmora
Way 3. Use ShareX to Record Lenovo
Way 4. Record Lenovo with Screencast-O-Matic
Way 1. Use Windows Game Bar
This software enables you to record a portion of your screen or the whole screen depending on your requirements, and the recording process may be completed in three easy steps. When you need to capture screenshots, it may also be utilized as a snapshot tool. Gamebar is a simple screen recording app for Lenovo Windows laptops that includes several features for creating high-quality footage.
Step 1: Press Win + G to open the Xbox Game Bar after clicking the Start button. The Xbox Game Bar appears at the top-focus border of your screen.
Step 2: On the left, choose Captures captured to examine and edit further customization options if required. There are also options to enable recording while projecting your screen, to define the maximum account duration, and to alter your sound and video quality settings.
Step 3: On the Capture overlay, click the circular Start Recording button to begin. Click the purple Stop button to cancel the account.
Step 4: All of the movies you’ve shot are stored as MP4 files in the following directory on your Lenovo laptop: Videos >> File Explorer >> This PC
Way 2. Record Lenovo with Filmora
With a wide variety of capabilities, Filmora is undoubtedly one of the finest Lenovo laptop screen recorder programs on the market right now. It may be used to record displays and capture many types of screenshots. The handy screen recorder is small and light, with a simple dashboard that neatly organizes all of the tools. Wondershare’s Filmora is a strong laptop screen recording program with a robust video editing toolbox for professional output. It can simultaneously record voiceover, display, and webcam. Not only that, but it also enables you to improve your videos after they’ve been captured by adding distinctive transitions and green screen effects.
Filmora Screen Recorder
Record computer screen and webcam
Capture system and microphone audio
Customize the target recording area
Edit videos with thousands of effects and tools
Step 1: Get Filmora and install it on your Lenovo laptop.
To begin, you must first download this software program to your Lenovo system from the following links:
After the download is complete, you must now install it on your Lenovo system to begin using it with the optimum compatibility with your laptop.
Step 2: Launch the Program and Begin Customizing It
The next step is to open the software program so that you can begin recording the Lenovo screen without difficulty. To begin, just go to the New Recording button in the start-up window, which will launch the recorder. With the incorporated tools in Filmora, you can completely modify your Lenovo screen recordings. You may also choose the audio source you want to use, such as a microphone, system sound from both, or your Lenovo laptop’s Webcam, to include in your recordings.
Step 3: Start/Stop Lenovo Screen Recording
Now is the time to start the recording, which you can do by pressing the red circular recording button, which will start the recording of your audio. Similarly, to stop the recording, press the Square-shaped button on your Lenovo laptop’s screen.
Step 4: Edit the Recordings and Save Them
For Win 7 or later (64-bit)
For macOS 10.12 or later
Finally, you may use completely customizable editing tools to alter your audio recordings. To do so, use Filmora’s editor and modify your recorded audio files using simple to advanced editing methods.
Way 3. Use ShareX to Record Lenovo
In terms of screen capture, ShareX is likewise open-source. You may use this free video recording program to record any action on your Lenovo computer’s screen. Using this lightweight screen capture program, there are no problems when it comes to capturing the screen. It not only allows you to record your screen, but it also allows you to manage your images and screenshots. You may select whether or not to include the cursor in the photo, set a timeframe, and even utilize the OCR tool to detect the text on your image while working with it. Because of its extensive screen-capture capabilities, the open-source program is popular among gamers. The “scrolling screenshot” option you’re searching for is among those capabilities, which include video capture, GIFs, region-select, and workflows, as well as a wide variety of filters and effects to add to your captures.
Step 1: Go to https://getsharex.com/ and download and launch the ShareX executable file.
Step 2: The nicest thing is that it can also record audio. Select your microphone as the audio source in Task Settings -> Screen Recorder under Capture -> Screen Recording Options.
Step 3: Fullscreen capture, capture a specific window or part of the screen, screen recording to video or Gif, and auto-capture are all possibilities under the Capture menu.
Step 4: When you record anything, it will be saved in the Screenshots folder on the left side menu. You may use this function to choose a file from your device and instantly upload it into the software for editing. A simple drag and drop motion may also be used to accomplish this.
Way 4. Record Lenovo with Screencast-O-Matic
You may use Screencast-O-Matic to record (‘screencast’) your computer’s screen. Every action you do will be documented. This recording is a video or audio recording that just contains your remarks. Screencast-O-Matic is a free screen capturing tool available online. This program captures a portion of your screen, as well as audio and camera input. This application may be used to capture narrated lectures or demos and turn them into videos for your courses. It is widely regarded as one of the most efficient screen recording apps for creating YouTube presentations and lessons.
Step 1. To install the Screencast Recorder on your PC, go to the following link:
https://screencast-o-matic.com/download
Step 2. To finish the installation, download and run the setup installer. Launch the Recorder from the Start Menu in Windows or the Application folder on a Mac machine when the installation is complete.
Step 3: You’ll notice a variety of modification choices inside the recorder to personalize your movie to your preferences. Free recording time is restricted to 15 minutes for each video; upgrade to a Deluxe or Premier subscription to get unlimited recording time. Both the free and commercial versions of the screen recorder allow you to record an unlimited number of videos.
Step 4: Save the file as an mp4, AVI, or FLV. Then, on your device, choose a target folder. Click “publish” after giving your video a name so you can locate it later.
Conclusion
The easiest method for screen capture on Lenovo is to utilize the key combination, however, there are limited customization options and commenting equipment. With the built-in basic tools, you may easily capture the perfect photo, sound document, or screen movie on the Windows screen. You may read about the best screen recorders for Lenovo laptops and choose one to begin recording. Filmora, which can cover practically all of your screen recording needs, is highly recommended for individuals who seek something simple and strong.
Also read:
- [New] 2024 Approved A Detailed Review of CamStudio ScreenCapture
- [New] Free2X Webcam Recorder Software Review for 2024
- [New] Getting Comfortable with Zoom A Beginner’s Tutorial for 2024
- [New] In 2024, Essential 3-Step Copywriting Blueprint for Effective FB Campaigns
- [New] In 2024, Free Frame Conversion Tweeting Vids Into Animated GIFs
- 2024 Approved Optimize Your iPhone for GIF Saving & Playing Like a Pro
- 2024 Approved Streamlining Your Screenshot Journey on Sony’s PlayStation 4 Console
- Comprehensive InMotion Electric Scooter Analysis: A Deep Dive Into Its Mighty Performance
- Enthusiastic Presentation Appraisal, Version 08 for 2024
- How to Remove Find My iPhone without Apple ID On your iPhone SE (2022)?
- In 2024, Craft the Perfect Twitch Livestream Experience 5 Must-Try Methods
- In 2024, Unleash Premium Zoom Audio Quality with Simple Adjustments
- Mute High Contrast Mode on Your PC, Windows
- Shutter Speed Mastery for Chromebook Users (Method #4)
- Uncomplicated Methods for Archiving Vimeo Content for 2024
- Title: [New] The Essential Lenovo Display Recording Hacks
- Author: Duchess
- Created at : 2024-12-22 08:06:46
- Updated at : 2024-12-23 03:54:26
- Link: https://screen-video-capture.techidaily.com/new-the-essential-lenovo-display-recording-hacks/
- License: This work is licensed under CC BY-NC-SA 4.0.