![[Updated] Microsoft Screen Recorder](https://thmb.techidaily.com/238e2de8d5663845563adee13d68f244664dc4975f435870883240d8e13b1f76.jpg)
[Updated] Microsoft Screen Recorder
Microsoft Screen Recorder
If you want to record your screen and you are a Windows 10 user, you can accomplish your objective with Microsoft screen recorder. There are two popular Microsoft screen recorders available, namely, Free Screen Recorder and Microsoft Stream. If you want to record the entire screen or a specific part such as a specific browser tab or an application’s screen area, Free Screen Recorder will serve the purpose perfectly. If you have a subscription to Office 365, you can use Microsoft Stream to create short screen recordings and share them with the team instantly.
While Free Screen Recorder is available free of cost, Microsoft Stream is a part of Office 365 which comes with a subscription plan. Therefore, Microsoft Stream is more suitable for professionals who use Office 365 applications for team activities, and they can quickly record their screens and share with the team members. Let us dive deep into Microsoft screen recorder Windows 10 and learn more about them.
Part 1. Microsoft Free Screen Recorder
Part 2. Microsoft Stream
Part 3. Best Way to Record Screen on Windows Computer

Part 1. Microsoft Free Screen Recorder
Free Screen Recorder is a simple video capturing tool to capture your computer screen as well as webcam with audio. You can capture the entire screen, browser tab, application screen, gameplay, as well as a specific area. You can capture audio from the microphone, system sound, as well as, both of them simultaneously.
Therefore, you can make professional tutorials, record web meetings, as well as live streams. This screen recorder Microsoft Windows 10 is available free of cost, and there is no watermark. Moreover, there is no capping on the screen recording time. Here are the steps to download and record the screen with Free Screen Recorder.
Step 1: Go to Microsoft Store from Start menu.
Step 2: Search for Free Screen Recorder and download and install the app.
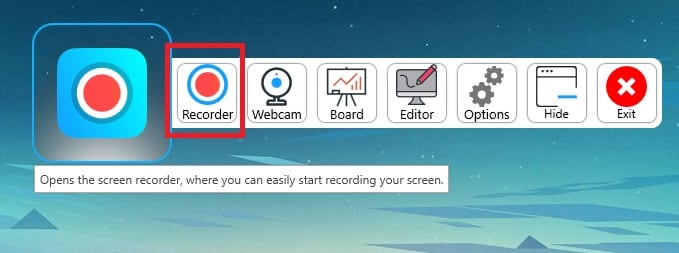
Step 3: Launch the app and it will open like a widget.
Step 4: Click on Recorder option from the widget.

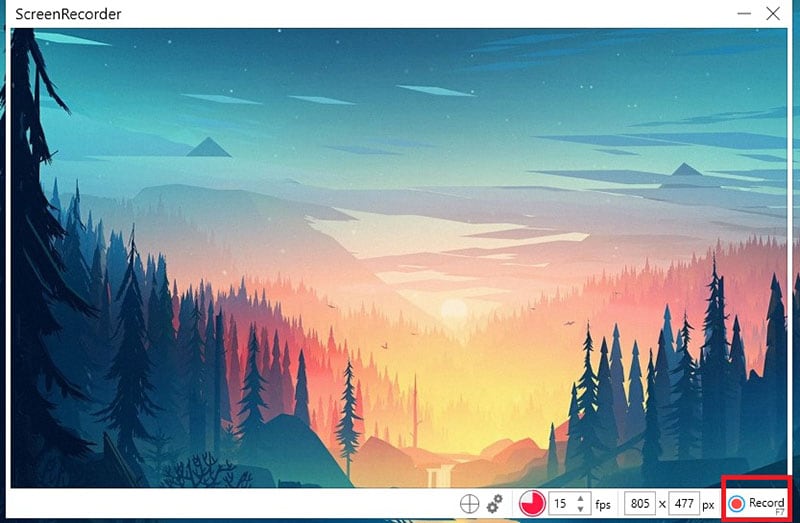
Step 5: Now you have to select the area of recording by expanding or contracting the window.
Step 6: Finally, click on Record option present at the bottom-right corner.
Step 7: Once you are done recording, you have to click on Stop option.

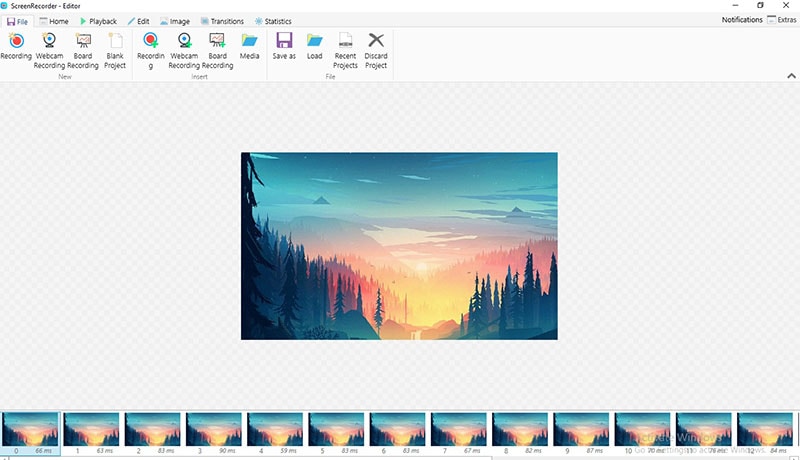
The recorded video will open on Free Screen Recorder editor.
Part 2. Microsoft Stream
Microsoft Stream is a versatile application which is mostly used by professionals to organize content coming from various Office 365 applications. Screen recording is a feature of Microsoft Stream and it lets you record the screen up to 15 minutes. You can record not only the screen but also the webcam and microphone. The reason you should use Microsoft Stream is that it comes bundled with Office 365.
Therefore, if you already have Office 365, there is no need for installing any other software as Microsoft Stream is already installed along with different applications of Office 365. Here are the steps to follow to record the screen with Microsoft screen recorder Windows 10 called Microsoft Stream.
Step 1: If you have already installed Office 365 on your computer, then Microsoft Stream is already present on your computer. Therefore, from the Start menu, search and open Microsoft Stream.
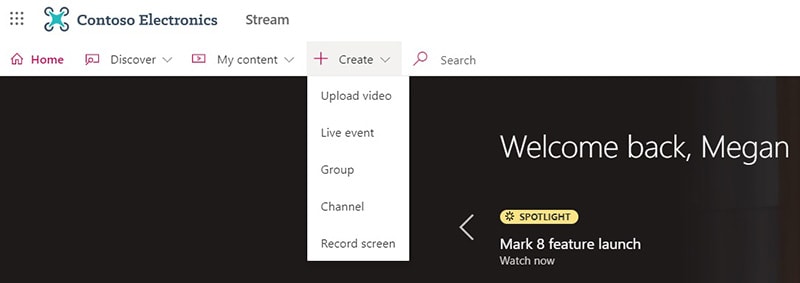
Step 2: Go to Create menu option.
Step 3: From the drop-down menu, select Record Screen option.

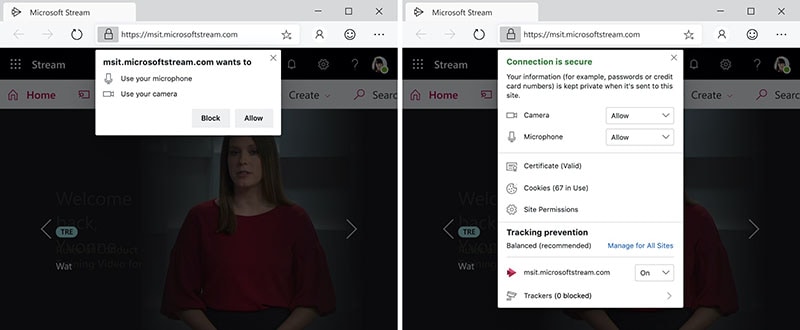
Step 4: Your web browser will open and click on Allow option to give permission to Stream to use webcam and microphone. Make sure you have either Microsoft Edge or Google Chrome installed.
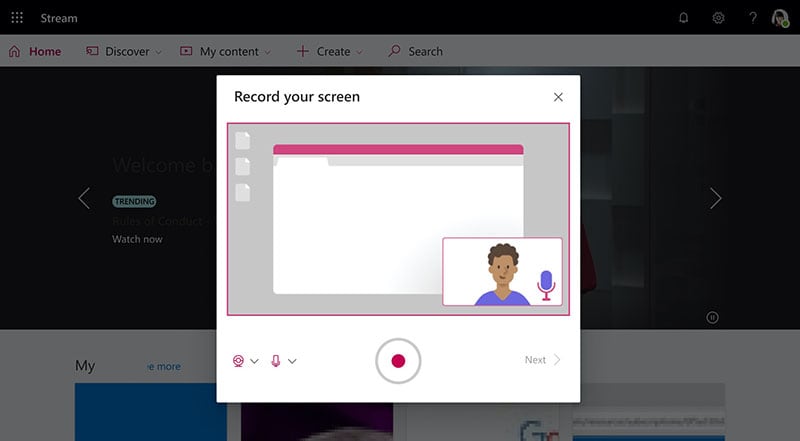
Step 5: Now you are ready to start recording and you have to click on Record icon to start recording.
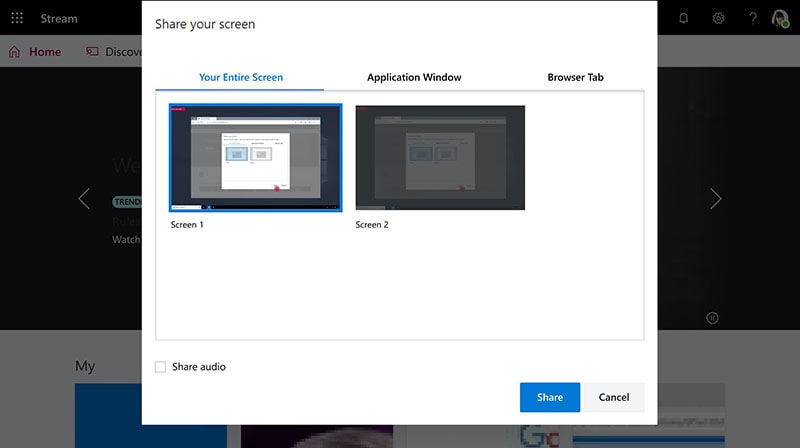
Step 6: Select Entire Screen or Application Screen, or Browser Tab whichever you want to record. Then click on Share button.
 Nero Burning ROM:
The ultimate burning program for all your needs!
Step 7: You will get a countdown so that you can get the screen ready for recording.
Step 8: Once you are done recording, you can click on Pause or Next option to stop recording and start reviewing the recorded video.


Part 3. Best Way to Record Screen on Windows Computer
If you have used Microsoft screen recorder Windows 7 or Windows 10 and you are not satisfied with the applications, you need to opt for a professional screen recorder for different operating systems. We recommend Filmora which is not just a professional screen recorder but also a video editor. Therefore, you can record the screen at the best quality as well as edit the recorded video to publish a professional-quality video.
You can record the screen at 4K resolution depending on your screen or game resolution. Filmora allows screen recording along with webcam, and you can record audio from all sources. You can even add a voiceover while editing the video. Its video editor is of professional quality, and it is packed with loads of features. You can add stunning audio effects, video effects, filters, and transitions. Here are the steps to record the screen with Filmora.
For Win 7 or later (64-bit)
For macOS 10.12 or later
Step 1: Download and install Wondershare Filmora.
Step 2: Launch the application and click on New Project.
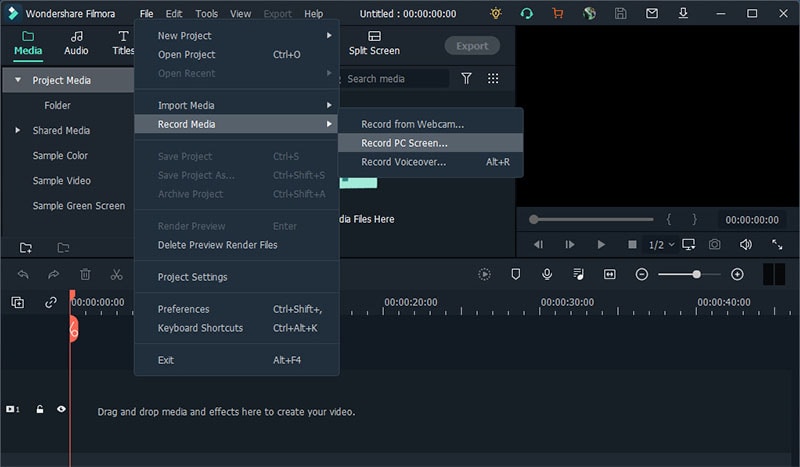
Step 3: Go to Record menu option and click on Record PC Screen.
Step 4: From the pop-up menu, select speakers or microphone as required.

Step 5: Finally, click on the Record button. You get a few seconds as a buffer to set up your screen to record.
Conclusion
If you are looking for a screen recorder Microsoft Windows 10, you can opt for Free Screen Recorder. If you have Office 365 installed, you need not install anything else as you can record screen with Microsoft Stream. If you are not satisfied with any of these, you will certainly love Wondershare Filmora where you can record the screen and edit videos and get professional-quality output.
Part 2. Microsoft Stream
Part 3. Best Way to Record Screen on Windows Computer
Part 1. Microsoft Free Screen Recorder
Free Screen Recorder is a simple video capturing tool to capture your computer screen as well as webcam with audio. You can capture the entire screen, browser tab, application screen, gameplay, as well as a specific area. You can capture audio from the microphone, system sound, as well as, both of them simultaneously.
Therefore, you can make professional tutorials, record web meetings, as well as live streams. This screen recorder Microsoft Windows 10 is available free of cost, and there is no watermark. Moreover, there is no capping on the screen recording time. Here are the steps to download and record the screen with Free Screen Recorder.
Step 1: Go to Microsoft Store from Start menu.
Step 2: Search for Free Screen Recorder and download and install the app.
Step 3: Launch the app and it will open like a widget.
Step 4: Click on Recorder option from the widget.
Step 5: Now you have to select the area of recording by expanding or contracting the window.
Step 6: Finally, click on Record option present at the bottom-right corner.
Step 7: Once you are done recording, you have to click on Stop option.
The recorded video will open on Free Screen Recorder editor.
Part 2. Microsoft Stream
Microsoft Stream is a versatile application which is mostly used by professionals to organize content coming from various Office 365 applications. Screen recording is a feature of Microsoft Stream and it lets you record the screen up to 15 minutes. You can record not only the screen but also the webcam and microphone. The reason you should use Microsoft Stream is that it comes bundled with Office 365.
Therefore, if you already have Office 365, there is no need for installing any other software as Microsoft Stream is already installed along with different applications of Office 365. Here are the steps to follow to record the screen with Microsoft screen recorder Windows 10 called Microsoft Stream.
Step 1: If you have already installed Office 365 on your computer, then Microsoft Stream is already present on your computer. Therefore, from the Start menu, search and open Microsoft Stream.
Step 2: Go to Create menu option.
Step 3: From the drop-down menu, select Record Screen option.
Step 4: Your web browser will open and click on Allow option to give permission to Stream to use webcam and microphone. Make sure you have either Microsoft Edge or Google Chrome installed.
Step 5: Now you are ready to start recording and you have to click on Record icon to start recording.
Step 6: Select Entire Screen or Application Screen, or Browser Tab whichever you want to record. Then click on Share button.
Step 7: You will get a countdown so that you can get the screen ready for recording.
Step 8: Once you are done recording, you can click on Pause or Next option to stop recording and start reviewing the recorded video.


Part 3. Best Way to Record Screen on Windows Computer
If you have used Microsoft screen recorder Windows 7 or Windows 10 and you are not satisfied with the applications, you need to opt for a professional screen recorder for different operating systems. We recommend Filmora which is not just a professional screen recorder but also a video editor. Therefore, you can record the screen at the best quality as well as edit the recorded video to publish a professional-quality video.
You can record the screen at 4K resolution depending on your screen or game resolution. Filmora allows screen recording along with webcam, and you can record audio from all sources. You can even add a voiceover while editing the video. Its video editor is of professional quality, and it is packed with loads of features. You can add stunning audio effects, video effects, filters, and transitions. Here are the steps to record the screen with Filmora.
For Win 7 or later (64-bit)
For macOS 10.12 or later
Step 1: Download and install Wondershare Filmora.
Step 2: Launch the application and click on New Project.
Step 3: Go to Record menu option and click on Record PC Screen.
Step 4: From the pop-up menu, select speakers or microphone as required.

Step 5: Finally, click on the Record button. You get a few seconds as a buffer to set up your screen to record.
Conclusion
If you are looking for a screen recorder Microsoft Windows 10, you can opt for Free Screen Recorder. If you have Office 365 installed, you need not install anything else as you can record screen with Microsoft Stream. If you are not satisfied with any of these, you will certainly love Wondershare Filmora where you can record the screen and edit videos and get professional-quality output.
Part 2. Microsoft Stream
Part 3. Best Way to Record Screen on Windows Computer
 PearlMountain Image Converter
Part 1. Microsoft Free Screen Recorder
Free Screen Recorder is a simple video capturing tool to capture your computer screen as well as webcam with audio. You can capture the entire screen, browser tab, application screen, gameplay, as well as a specific area. You can capture audio from the microphone, system sound, as well as, both of them simultaneously.
Therefore, you can make professional tutorials, record web meetings, as well as live streams. This screen recorder Microsoft Windows 10 is available free of cost, and there is no watermark. Moreover, there is no capping on the screen recording time. Here are the steps to download and record the screen with Free Screen Recorder.
Step 1: Go to Microsoft Store from Start menu.
Step 2: Search for Free Screen Recorder and download and install the app.
Step 3: Launch the app and it will open like a widget.
Step 4: Click on Recorder option from the widget.
Step 5: Now you have to select the area of recording by expanding or contracting the window.
Step 6: Finally, click on Record option present at the bottom-right corner.
Step 7: Once you are done recording, you have to click on Stop option.
The recorded video will open on Free Screen Recorder editor.

Part 2. Microsoft Stream
Microsoft Stream is a versatile application which is mostly used by professionals to organize content coming from various Office 365 applications. Screen recording is a feature of Microsoft Stream and it lets you record the screen up to 15 minutes. You can record not only the screen but also the webcam and microphone. The reason you should use Microsoft Stream is that it comes bundled with Office 365.
Therefore, if you already have Office 365, there is no need for installing any other software as Microsoft Stream is already installed along with different applications of Office 365. Here are the steps to follow to record the screen with Microsoft screen recorder Windows 10 called Microsoft Stream.
Step 1: If you have already installed Office 365 on your computer, then Microsoft Stream is already present on your computer. Therefore, from the Start menu, search and open Microsoft Stream.
Step 2: Go to Create menu option.
Step 3: From the drop-down menu, select Record Screen option.
Step 4: Your web browser will open and click on Allow option to give permission to Stream to use webcam and microphone. Make sure you have either Microsoft Edge or Google Chrome installed.
Step 5: Now you are ready to start recording and you have to click on Record icon to start recording.
Step 6: Select Entire Screen or Application Screen, or Browser Tab whichever you want to record. Then click on Share button.
Step 7: You will get a countdown so that you can get the screen ready for recording.
Step 8: Once you are done recording, you can click on Pause or Next option to stop recording and start reviewing the recorded video.
Part 3. Best Way to Record Screen on Windows Computer
If you have used Microsoft screen recorder Windows 7 or Windows 10 and you are not satisfied with the applications, you need to opt for a professional screen recorder for different operating systems. We recommend Filmora which is not just a professional screen recorder but also a video editor. Therefore, you can record the screen at the best quality as well as edit the recorded video to publish a professional-quality video.
You can record the screen at 4K resolution depending on your screen or game resolution. Filmora allows screen recording along with webcam, and you can record audio from all sources. You can even add a voiceover while editing the video. Its video editor is of professional quality, and it is packed with loads of features. You can add stunning audio effects, video effects, filters, and transitions. Here are the steps to record the screen with Filmora.
For Win 7 or later (64-bit)
For macOS 10.12 or later
Step 1: Download and install Wondershare Filmora.
Step 2: Launch the application and click on New Project.
Step 3: Go to Record menu option and click on Record PC Screen.
Step 4: From the pop-up menu, select speakers or microphone as required.
Step 5: Finally, click on the Record button. You get a few seconds as a buffer to set up your screen to record.
Conclusion
If you are looking for a screen recorder Microsoft Windows 10, you can opt for Free Screen Recorder. If you have Office 365 installed, you need not install anything else as you can record screen with Microsoft Stream. If you are not satisfied with any of these, you will certainly love Wondershare Filmora where you can record the screen and edit videos and get professional-quality output.
Part 2. Microsoft Stream
Part 3. Best Way to Record Screen on Windows Computer

Part 1. Microsoft Free Screen Recorder
Free Screen Recorder is a simple video capturing tool to capture your computer screen as well as webcam with audio. You can capture the entire screen, browser tab, application screen, gameplay, as well as a specific area. You can capture audio from the microphone, system sound, as well as, both of them simultaneously.
Therefore, you can make professional tutorials, record web meetings, as well as live streams. This screen recorder Microsoft Windows 10 is available free of cost, and there is no watermark. Moreover, there is no capping on the screen recording time. Here are the steps to download and record the screen with Free Screen Recorder.
Step 1: Go to Microsoft Store from Start menu.
Step 2: Search for Free Screen Recorder and download and install the app.
Step 3: Launch the app and it will open like a widget.
Step 4: Click on Recorder option from the widget.
Step 5: Now you have to select the area of recording by expanding or contracting the window.
Step 6: Finally, click on Record option present at the bottom-right corner.
Step 7: Once you are done recording, you have to click on Stop option.
The recorded video will open on Free Screen Recorder editor.

WPS Office Premium ( File Recovery, Photo Scanning, Convert PDF)–Yearly
Part 2. Microsoft Stream
Microsoft Stream is a versatile application which is mostly used by professionals to organize content coming from various Office 365 applications. Screen recording is a feature of Microsoft Stream and it lets you record the screen up to 15 minutes. You can record not only the screen but also the webcam and microphone. The reason you should use Microsoft Stream is that it comes bundled with Office 365.
Therefore, if you already have Office 365, there is no need for installing any other software as Microsoft Stream is already installed along with different applications of Office 365. Here are the steps to follow to record the screen with Microsoft screen recorder Windows 10 called Microsoft Stream.
Step 1: If you have already installed Office 365 on your computer, then Microsoft Stream is already present on your computer. Therefore, from the Start menu, search and open Microsoft Stream.
Step 2: Go to Create menu option.
Step 3: From the drop-down menu, select Record Screen option.
Step 4: Your web browser will open and click on Allow option to give permission to Stream to use webcam and microphone. Make sure you have either Microsoft Edge or Google Chrome installed.
Step 5: Now you are ready to start recording and you have to click on Record icon to start recording.
Step 6: Select Entire Screen or Application Screen, or Browser Tab whichever you want to record. Then click on Share button.
Step 7: You will get a countdown so that you can get the screen ready for recording.
Step 8: Once you are done recording, you can click on Pause or Next option to stop recording and start reviewing the recorded video.
Part 3. Best Way to Record Screen on Windows Computer
If you have used Microsoft screen recorder Windows 7 or Windows 10 and you are not satisfied with the applications, you need to opt for a professional screen recorder for different operating systems. We recommend Filmora which is not just a professional screen recorder but also a video editor. Therefore, you can record the screen at the best quality as well as edit the recorded video to publish a professional-quality video.
You can record the screen at 4K resolution depending on your screen or game resolution. Filmora allows screen recording along with webcam, and you can record audio from all sources. You can even add a voiceover while editing the video. Its video editor is of professional quality, and it is packed with loads of features. You can add stunning audio effects, video effects, filters, and transitions. Here are the steps to record the screen with Filmora.
For Win 7 or later (64-bit)
For macOS 10.12 or later
Step 1: Download and install Wondershare Filmora.
Step 2: Launch the application and click on New Project.
Step 3: Go to Record menu option and click on Record PC Screen.
Step 4: From the pop-up menu, select speakers or microphone as required.
Step 5: Finally, click on the Record button. You get a few seconds as a buffer to set up your screen to record.

Conclusion
If you are looking for a screen recorder Microsoft Windows 10, you can opt for Free Screen Recorder. If you have Office 365 installed, you need not install anything else as you can record screen with Microsoft Stream. If you are not satisfied with any of these, you will certainly love Wondershare Filmora where you can record the screen and edit videos and get professional-quality output.
- Title: [Updated] Microsoft Screen Recorder
- Author: Duchess
- Created at : 2024-07-21 13:35:28
- Updated at : 2024-07-22 13:35:28
- Link: https://screen-video-capture.techidaily.com/updated-microsoft-screen-recorder/
- License: This work is licensed under CC BY-NC-SA 4.0.