![[Updated] The Ultimate Keyboard Shortcut Compendium for Mac Screening](https://thmb.techidaily.com/73ab3c04255810df2615a2a01c8a14174dd9b221f2d60ec5b3831dd32989cbba.jpg)
[Updated] The Ultimate Keyboard Shortcut Compendium for Mac Screening
The Ultimate Keyboard Shortcut Compendium for Mac Screening
Considering how to begin and stop screen record mac shortcut? We take care of you with a few strategies to record videos of what’s on your screen. There are commonly when recording your Mac screen can prove to be useful. Perhaps you need to make a screencast instructional exercise. Maybe you’re making a business show. Or then again perhaps you’re keen on making video notes for yourself. Luckily, you can without much of a stretch figure out how to screen record on Mac shortcut. You can figure out how to record video on Mac to make instructional exercises, video interactivity, online classes, and then some. A Mac screen recorder with sound is especially valuable for client assistance specialists who need to walk clients through an item issue.
At the point when you need to screen record with shortcuts on Mac and a screen capture sufficiently isn’t, you’ll be glad to know there are numerous ways of recording your screen. Regardless of whether you need to catch the whole screen or simply a piece of it or record your voice or different sounds at the same time, Mac has every one of the apparatuses you want. Whatever the explanation, it’s basic and simple. The best screen recorder for Mac conveys an immaculate cycle to record the screen, in different ways, other than additional elements like webcam catch, explanations, video altering, and the sky is the limit from there. Also, in particular, a decent Mac screen catch instrument conveys top-notch results to guarantee that the watcher has a paradise of a period. So, this is the way to begin and quit recording your Mac screen with maybe a couple of strategies.
Part 1. Screen Record Shortcut on Mac
Part 2. Alternative Software to Record Screen on Mac
Part 1. Screen Record Shortcut on Mac
Recording your PC screen is a helpful method for catching what you’re doing on your gadget. On a Mac, you can utilize it to record MacOS interactivity or tell a companion the best way to play out an errand … because occasionally showing somebody is a lot more straightforward than attempting to clarify it. macOS offers more choices with regards to screen-catching. With macOS, you can catch the whole screen, the dynamic screen, or the not settled locale. Additionally, macOS has an underlying apparatus to record screens, incorporating sound. Or on the other hand, you can utilize convenient outsider applications that assist you with opening further developed screen recording capacities, alter your accounts and offer with your colleagues.
Steps to Use Screen Record Shortcut on Mac
Assuming that you’re running the most recent variant of macOS, you can utilize Mac’s new Screenshot Bar instrument to record a video, yet this element is just accessible for Macs running macOS 10.14 Mojave or higher. Different situations call for such software like when you want to make macOS instructional exercises, report bugs, catch the web-based video, record interactivity/online classes/gatherings, record yourself utilizing the webcam, take screen captures, just to specify a couple. Here are the steps for you to find out.
Step 1: Launch Recorder with Shortcut
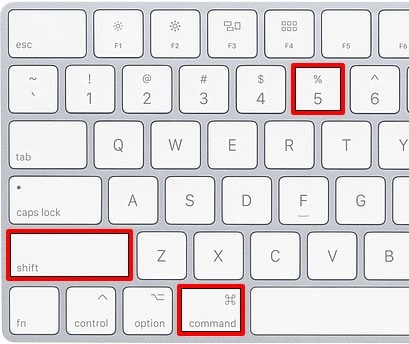
Press Command, shift, and 5 on the console at the same time. The screen capture will open. At the lower part of your screen, you’ll see the Screenshot control bar. You have choices for getting a still screen capture or for recording a video. You can perceive which choices are for video recording since you’ll see a little circle recording symbol on the logo.
Step 2: Select Recording Mode
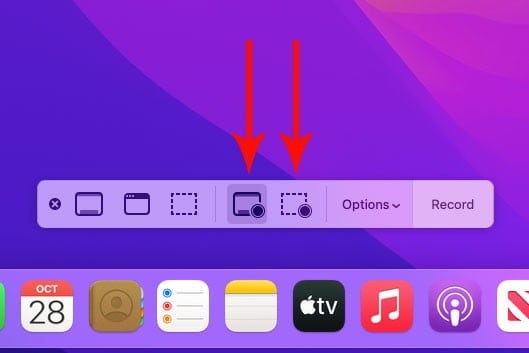
Pick whether you need to “Record Entire Screen” or “Record Selected Portion.” If you decide to record just a part of your screen, a container will appear permitting you to drag and resize the recording window. Click on “Choices” to see what different inclinations you can pick. You can set a commencement clock, pick which receiver to utilize, and choose where to save your recording, for instance, as shown here:
Step 3: Start Recording
Whenever you’ve chosen the choices you need, it’s an ideal opportunity to record. Click the “Record button.” Or, on the off chance that you’re recording the whole screen, you can click anyplace on the screen to begin recording. Assuming that you’ve decided to set the clock, you’ll see the clock counting down until the recording starts. If not, the recording will start right away. Assuming that you chose Record Selected Portion, you will see a container on-screen showing what will be caught. Snap and drag the handles at the edges of this container to change what is recorded. You can move this choice to any place you need. At the point when you’re prepared, click Record.

Step 4: End the Recording
To stop the recording, click on the little square stop button in the upper right corner of the menu bar from the highest point of your screen. You can likewise hit Command, control, ESC to quit recording. Or on the other hand, hit Command, shift, 5 and the screen capture bar will return with a stop button you can click. Or on the other hand, assuming that you have a Touch Bar, you’ll see a stop button in the upper left. When you quit recording, you’ll momentarily see a thumbnail of the video in the lower-right corner of your screen. Assuming you swipe the thumbnail to one side or sit idle, your recording will consequently save as a MOV format in the directory you’ve set.

Part 2. Alternative Software to Record Screen on Mac
Screen recording has turned into an expanding normal movement in business, not least for internet preparing and instruction purposes. Filmora (Windows, macOS) has been in the screen recording game longer than most and offers a bigger number of elements than most as well - just as catching what’s on-screen easily, this completely fledged video altering arrangement can likewise add a lot of additional items and alters on top as well. Despite every one of its elements, the product never feels excessively intricate, because of a natural course of events interface. Assuming that you’re attempting to exhibit a specific software, the capacity to follow your console strokes and your mouse clicks comes in exceptionally convenient as well.
Filmora is a definitive screen recording software for macOS as it makes proficient looking screencasts easily. As far as the screen catch choices, you can record the whole screen, a district, explicit aspects, an application, or a window. Anything you desire to record, from games to PowerPoints, Filmora can take everything in its step, with or without sound, with or without a webcam feed, etc. That is other than giving a webcam catch to assist you with adding an individual touch to the primary video. Concerning sound, you can get that from the MacBook Pro framework or amplifier and access additional altering choices to refine the sound further. Additionally, you can make the screen video considerably more useful by fusing explanations, cursor FX, shut subtitles, activities, and then some. Have confidence that there are significantly more elements to investigate.
How to Record Video with Filmora
Filmora joins a wide arrangement of apparatuses with a simple to-utilize interface and has the advantage of being both a speedy catch instrument and a completely highlighted supervisor. To know How to Screen Record on Filmora Mac here are the steps to follow:
Step 1: Download Filmora for Mac
To begin with Filmora on your MacBook, you need to visit the official website and download the latest macOS version of Wondershare Filmora. As soon as the download has been completed, install the toolkit to your MacBook and then, open the software. Now, hit the New Project catch and you will see the underlying window interface of this product.
For Win 7 or later (64-bit)
For macOS 10.12 or later
Step 2: Set up the MacBook Recording Screen
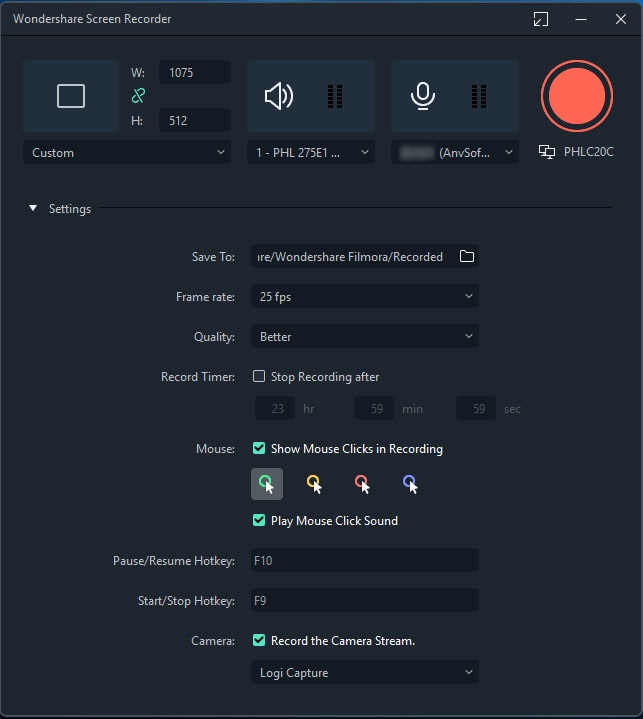
From that recorder interface, click on the record button and select the Record PC Screen. Here you can choose the best video capturing settings for your screen to be recorded. Filmora gives you the choice to enable the microphone, system sounds, webcam and another setting for your screen recording handily.
Step 3: Start Recording
At last, when you’re ready, hit the Record button and it shall start the recording after giving you a 3-second get-ready time. You can start recording your screen activity afterwards. Then, stop the recording by hitting the stop button and it’ll allow you to add explanations, additional media documents, changes, titles and more can then all be dropped in with your recording.

Step 4: Edit and Save Your Recordings
After you’re done with the recording, hit the Stop button and go through the Video Editor features to utilize them to the best extent. You can use Titles, Transitions, Cursor Settings, audio editing and much more with the Editor. Afterwards, to share your work of art straightforwardly to YouTube or some other renowned stage, go for the Export button and select the platform to share your video recording.
Conclusion
A screen recorder is an instrument that catches content on your Mac screen and saves it in video or screen capture design. Luckily, the Mac has an inherent screen recording device that you can begin pretty quick but it lacks several features. Hence, with Filmora as a method for aiding the watcher centre, you approach the zoom-in highlight while recording other than the choice to draw and incorporate subtitles were vital. Sound from the amplifier (portrayal) or potentially framework sound can likewise be caught at the same time with the video.
Part 2. Alternative Software to Record Screen on Mac
Part 1. Screen Record Shortcut on Mac
Recording your PC screen is a helpful method for catching what you’re doing on your gadget. On a Mac, you can utilize it to record MacOS interactivity or tell a companion the best way to play out an errand … because occasionally showing somebody is a lot more straightforward than attempting to clarify it. macOS offers more choices with regards to screen-catching. With macOS, you can catch the whole screen, the dynamic screen, or the not settled locale. Additionally, macOS has an underlying apparatus to record screens, incorporating sound. Or on the other hand, you can utilize convenient outsider applications that assist you with opening further developed screen recording capacities, alter your accounts and offer with your colleagues.
Steps to Use Screen Record Shortcut on Mac
Assuming that you’re running the most recent variant of macOS, you can utilize Mac’s new Screenshot Bar instrument to record a video, yet this element is just accessible for Macs running macOS 10.14 Mojave or higher. Different situations call for such software like when you want to make macOS instructional exercises, report bugs, catch the web-based video, record interactivity/online classes/gatherings, record yourself utilizing the webcam, take screen captures, just to specify a couple. Here are the steps for you to find out.
Step 1: Launch Recorder with Shortcut
Press Command, shift, and 5 on the console at the same time. The screen capture will open. At the lower part of your screen, you’ll see the Screenshot control bar. You have choices for getting a still screen capture or for recording a video. You can perceive which choices are for video recording since you’ll see a little circle recording symbol on the logo.
Step 2: Select Recording Mode
Pick whether you need to “Record Entire Screen” or “Record Selected Portion.” If you decide to record just a part of your screen, a container will appear permitting you to drag and resize the recording window. Click on “Choices” to see what different inclinations you can pick. You can set a commencement clock, pick which receiver to utilize, and choose where to save your recording, for instance, as shown here:
Step 3: Start Recording
Whenever you’ve chosen the choices you need, it’s an ideal opportunity to record. Click the “Record button.” Or, on the off chance that you’re recording the whole screen, you can click anyplace on the screen to begin recording. Assuming that you’ve decided to set the clock, you’ll see the clock counting down until the recording starts. If not, the recording will start right away. Assuming that you chose Record Selected Portion, you will see a container on-screen showing what will be caught. Snap and drag the handles at the edges of this container to change what is recorded. You can move this choice to any place you need. At the point when you’re prepared, click Record.
Step 4: End the Recording
To stop the recording, click on the little square stop button in the upper right corner of the menu bar from the highest point of your screen. You can likewise hit Command, control, ESC to quit recording. Or on the other hand, hit Command, shift, 5 and the screen capture bar will return with a stop button you can click. Or on the other hand, assuming that you have a Touch Bar, you’ll see a stop button in the upper left. When you quit recording, you’ll momentarily see a thumbnail of the video in the lower-right corner of your screen. Assuming you swipe the thumbnail to one side or sit idle, your recording will consequently save as a MOV format in the directory you’ve set.
Part 2. Alternative Software to Record Screen on Mac
Screen recording has turned into an expanding normal movement in business, not least for internet preparing and instruction purposes. Filmora (Windows, macOS) has been in the screen recording game longer than most and offers a bigger number of elements than most as well - just as catching what’s on-screen easily, this completely fledged video altering arrangement can likewise add a lot of additional items and alters on top as well. Despite every one of its elements, the product never feels excessively intricate, because of a natural course of events interface. Assuming that you’re attempting to exhibit a specific software, the capacity to follow your console strokes and your mouse clicks comes in exceptionally convenient as well.
Filmora is a definitive screen recording software for macOS as it makes proficient looking screencasts easily. As far as the screen catch choices, you can record the whole screen, a district, explicit aspects, an application, or a window. Anything you desire to record, from games to PowerPoints, Filmora can take everything in its step, with or without sound, with or without a webcam feed, etc. That is other than giving a webcam catch to assist you with adding an individual touch to the primary video. Concerning sound, you can get that from the MacBook Pro framework or amplifier and access additional altering choices to refine the sound further. Additionally, you can make the screen video considerably more useful by fusing explanations, cursor FX, shut subtitles, activities, and then some. Have confidence that there are significantly more elements to investigate.
How to Record Video with Filmora
Filmora joins a wide arrangement of apparatuses with a simple to-utilize interface and has the advantage of being both a speedy catch instrument and a completely highlighted supervisor. To know How to Screen Record on Filmora Mac here are the steps to follow:
Step 1: Download Filmora for Mac
To begin with Filmora on your MacBook, you need to visit the official website and download the latest macOS version of Wondershare Filmora. As soon as the download has been completed, install the toolkit to your MacBook and then, open the software. Now, hit the New Project catch and you will see the underlying window interface of this product.
For Win 7 or later (64-bit)
For macOS 10.12 or later
Step 2: Set up the MacBook Recording Screen
From that recorder interface, click on the record button and select the Record PC Screen. Here you can choose the best video capturing settings for your screen to be recorded. Filmora gives you the choice to enable the microphone, system sounds, webcam and another setting for your screen recording handily.
Step 3: Start Recording
At last, when you’re ready, hit the Record button and it shall start the recording after giving you a 3-second get-ready time. You can start recording your screen activity afterwards. Then, stop the recording by hitting the stop button and it’ll allow you to add explanations, additional media documents, changes, titles and more can then all be dropped in with your recording.
Step 4: Edit and Save Your Recordings
After you’re done with the recording, hit the Stop button and go through the Video Editor features to utilize them to the best extent. You can use Titles, Transitions, Cursor Settings, audio editing and much more with the Editor. Afterwards, to share your work of art straightforwardly to YouTube or some other renowned stage, go for the Export button and select the platform to share your video recording.
Conclusion
A screen recorder is an instrument that catches content on your Mac screen and saves it in video or screen capture design. Luckily, the Mac has an inherent screen recording device that you can begin pretty quick but it lacks several features. Hence, with Filmora as a method for aiding the watcher centre, you approach the zoom-in highlight while recording other than the choice to draw and incorporate subtitles were vital. Sound from the amplifier (portrayal) or potentially framework sound can likewise be caught at the same time with the video.
Also read:
- [New] 2024 Approved 2023'S Best Screen Recorder? Discover with CamStudio
- [New] 2024 Approved The Compreeher’s Guide to SRT File Flexibility
- [New] Critical Insight Into Recmeister's Video Capture Efficacy for 2024
- [New] Video Mastery Challenge VLC Meets the Test Against MX
- [Updated] 2024 Approved Rapidly Rendering Fortnite Cover Images
- Adapting to New Horizons: Migrating Apps for a Windows 11 Laptop
- Embrace World Typography on Windows - Font Guide
- How Do I Stop Someone From Tracking My Vivo Y78t? | Dr.fone
- How to Repair corrupt MP4 and MOV files of Realme ?
- Leading Android MOBA Games Unveiled
- Screen Capture Mastery with iRecorder for 2024
- Title: [Updated] The Ultimate Keyboard Shortcut Compendium for Mac Screening
- Author: Duchess
- Created at : 2025-01-13 23:21:55
- Updated at : 2025-01-19 19:03:00
- Link: https://screen-video-capture.techidaily.com/updated-the-ultimate-keyboard-shortcut-compendium-for-mac-screening/
- License: This work is licensed under CC BY-NC-SA 4.0.